사용 설명서 Trak LTS 스노우 체인
Trak LTS 스노우 체인 에 대한 매뉴얼이 필요하십니까? 아래에서 한국어로 된 PDF 매뉴얼을 무료로 보고 다운로드할 수 있습니다. 이 제품은 현재 1 개의 자주 묻는 질문(FAQ), 0 개의 댓글이 있고 0 개의 투표를 받았습니다. 원하시는 매뉴얼이 아닐 경우 당사로 연락주시기 바랍니다.
제품 결함에 대한 해결책이 사용 설명서에 없나요? Repair Café 가셔서 무료 수리 서비스를 받을 수 있습니다.
사용 설명서
Loading…

1 2
3
IT
PRIMA DI PARTIRE…
TRAK chains are so simple to put on that you will really appreciate their exclusive technical innovation, their ease of use and excellent performance
for driving safety and travelling comfort.
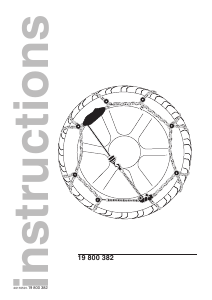
A) CHOOSE THE CORRECT SET OF HOOKS FOR THE RUBBER TENSIONER: Trak comes with a standard set of short hooks (painted red) already
mounted. This set-up is suitable for the wheel rim configuration shown in the picture (fig. 1).
Should your vehicle have twinned wheel rim models (fig. 2), you will need to replace the short hooks with the longer hooks (supplied in the kit attached
to the packaging). To make insertion easier, pull on the tensioner to widen the hole and make sure that the rounded end of the hook is inserted into
the hole (fig. 3).
B) ADJUST THE POSITION OF THE HOOKS ON THE RUBBER TENSIONER. So that the TRAK chain automatically makes contact with the tyre tread,
the five sections of the rubber tensioner must be sufficiently stretched when the hooks are fastened to the holes in the wheel rim. If this is not the
case, you can adjust the factory-set position (B) of the hooks on the tensioner, as follows:
Tensioner is too loose – no tension: shorten the position of the hook by moving it to position C – (fig. 4)
Tensioner is too tight – hook won’t reach hole: lengthen the position of the hook by moving it to position A – (fig. 4)
GB
BEFORE YOU START…
Die Montage der TRAK-Kette erfolgt in wenigen einfachen Schritten, die Ihnen die exklusive technische Innovation, die Bedienerfreundlichkeit und
die außergewöhnlichen Leistungen in Sachen Fahrsicherheit und -komfort schnell verdeutlichen werden.
A) WÄHLEN SIE DAS RICHTIGE HAKENSET FÜR DEN GUMMISPANNER: Trak ist serienmäßig mit einer Reihe bereits montierter kurzer Haken (rot
lackiert) ausgestattet. Diese Ausstattung ist für die abgebildete Felgenkonfiguration geeignet (Abbildung 1).
Sollte Ihr Fahrzeug mit Felgen für Zwillingsbereifung (Abbildung 2) ausgestattet sein, müssen die kurzen Haken durch die längeren ersetzt werden
(im mitgelieferten Set enthalten). Behelfen Sie sich beim Einsetzen durch Anziehen des Spanners, um die Bohrung zu erweitern. Achten Sie darauf,
dass der Haken von der Seite mit dem abgerundeten Ende aus eingesetzt wird (Abbildung 3).
B) STELLEN SIE DIE POSITION DER HAKEN AM GUMMISPANNER EIN. Damit sich die TRAK-Kette automatisch auf den Reifen aufzieht, müssen die
fünf Abschnitte des Gummispanners nach der Befestigung der Haken an den Bohrungen der Felge die richtige Spannung haben. Sollte das nicht der
Fall sein, kann die Position der Haken am Spanner (werkseitige Position: B) wie folgt verändert werden:
Spanner zu locker: Der Haken muss in Position C gebracht werden - (Abbildung 4)
Spanner zu fest angezogen – Haken lässt sich nicht in der Bohrung befestigen: Der Haken muss in Position A gebracht werden A - (Abbildung 4)
DE
VORR BEGINN…
Il montaggio della catena TRAK prevede pochi e semplici passaggi che ti permetteranno di apprezzarne l’esclusiva innovazione tecnica, le
caratteristiche di semplicità di utilizzo e le eccezionali prestazioni come sicurezza di guida e confort di marcia.
A) SCEGLI IL SET DI GANCI PER TENDITORE IN GOMMA CORRETTI: Trak e’ equipaggiata di serie con ganci corti (verniciati rossi) già montati.
Questa situazione e’ adatta alla configurazione dei cerchioni come da disegno (figura 1).
Qualora il vostro veicolo sia equipaggiato con un modello di cerchione a ruote gemellate (figura 2), occorrerà cambiare i ganci corti con i ganci più
lunghi (disponibili nel kit allegato alla confezione). Nell’operazione di inserimento aiutatevi tirando il tenditore al fine di allargare il foro e fate attenzione
che il gancio venga inserito nel foro dalla parte dell’estremità arrotondata. (figura 3)
B) REGOLA LA POSIZIONE DEI GANCI SUL TENDITORE IN GOMMA. Affinché la catena TRAK si disponga automaticamente sul battistrada, occorre
che le cinque tratte del tenditore in gomma, una volta agganciati i ganci ai fori del cerchione, abbiano una adeguata tensione. Qualora ciò non
avvenisse , è possibile regolare la posizione dei ganci sul tenditore, disposti dalla fabbrica in posizione B procedendo come segue:
Tenditore molle – senza tensione: occorre accorciare la posizione del gancio spostandolo in posizione C - (figura 4)
Tenditore troppo teso – gancio impossibile da agganciare sul foro: occorre allungare la posizione del gancio spostandolo in posizione A - (figura 4)

Loading…
등급
Trak LTS 스노우 체인 대해 어떻게 생각하시는지 제품 평점을 남겨 알려주세요. 제품 후기 및 질문을 공유하고 싶으신가요? 페이지 하단에 코멘트를 남겨주세요.이 설명서에 대한 추가 정보
Trak LTS 스노우 체인에 대한 종이 설명서가 있으면 좋다고 생각합니다. 언제든지 당사 웹사이트에서 설명서를 다운로드하여 직접 인쇄하실 수 있습니다. 원본 설명서를 원하시면 Trak에 문의하시기 바랍니다. 원본 매뉴얼을 제공할 수도 있습니다. 다른 언어로 된 Trak LTS 스노우 체인 설명서를 찾고 계십니까? 홈페이지에서 원하는 언어를 선택하고 모델 번호를 검색하여 사용 가능한지 확인하세요.
명세서
| 브랜드 | Trak |
| 모델 | LTS |
| 범주 | 스노우 체인 |
| 파일 형식 | |
| 파일 크기 | 2.01 MB |
Trak 스노우 체인에 대한 모든 매뉴얼
스노우 체인의 추가 매뉴얼
Trak LTS 스노우 체인에 대해 자주 묻는 질문
저희 지원 팀은 자주 묻는 질문에 대한 유용한 제품 정보 및 답변을 찾고 있습니다. 자주 묻는 질문에 오류를 발견하신다면, 연락 양식에 따라 알려주시기 바랍니다.
스노우체인은 어느 바퀴에 장착해야 하나요? 확인 됨
스노우체인은 차량의 '구동' 바퀴에 장착해야 합니다. 사륜구동 차량은 앞바퀴에 장착하는 것이 가장 좋습니다. 문의 사항은 딜러에게 질문하시기 바랍니다.
도움이 됐습니다 (56) 더 읽어보세요


이 제품에 대한 대화 참여
여기서 Trak LTS 스노우 체인에 대한 귀하의 생각을 공유할 수 있습니다. 궁금한 점이 있으면 먼저 설명서를 주의 깊게 읽어보세요. 매뉴얼 요청은 문의 양식을 사용하여 수행할 수 있습니다.