
DR-260USB [E] 3-249-678-34(1)
DR-260USB [E] 3-249-678-34(1)
MIC
MUTING
VOLUME
MIC LEVEL
T
A
L
K
M
U
T
I
N
G
3-249-678-34(1)
Stereo Headset
Operating Instructions
사용설명서
使用說明書
DR-260USB
2003 Sony Corporation Printed in Malaysia
English
WARNING
To prevent fire or shock hazard, do not
expose the unit to rain or moisture.
To prevent fire or shock hazard, do not place objects
filled with liquids, such as vases, on the apparatus.
To avoid electrical shock, do not open the cabinet.
Refer servicing to qualified personnel only.
CE mark
The validity of the CE marking is restricted to only
those countries when it is legally enforced, mainly in
the countries EEA (European Economic Area).
•Microsoft and Windows are registered trademarks
or trademarks of Microsoft Corporation in the
United States and / or other countries.
•IBM and PC/AT are registered trademarks of
International Business Machines Corporation.
•Pentium is a trademark or registered trademark of
Intel Corporation.
•In this manual, Microsoft
®
Windows
®
XP Home
Edition and Microsoft
®
Windows
®
XP Professional
are referred to as Windows XP.
•In this manual, Microsoft
®
Windows
®
2000
Professional is referred to as Windows 2000.
•In this manual, Microsoft
®
Windows
®
Millennium
Edition is referred to as Windows Me.
•In this manual, Microsoft
®
Windows
®
98 Second
Edition is referred to as Windows 98SE.
•All other names of systems and products are
trademarks or registered trademarks of their
respective owners.
TM
and
®
marks are omitted in
this manual.
Welcome!
Thank you for purchasing the Sony
DR-260USB Stereo Headset. Before operating the unit,
please read this manual thoroughly and retain it for
future reference.
Some features are:
•Designed for comfortable, long term use.
•Digital transmission via USB connection preventing
noise from your computer.
•Handy operation via USB Audio Box functions, such
as headphone volume, microphone volume, and
muting.
•Flexible Boom microphone design for reduced noise
and easy adjustment and positioning in front of your
mouth.
•Practical long cord for both headphone and
Dedicated USB cable for use anywhere regardless of
your computer’s location.
Specifications
Stereo Headset DR-260DP
Cord 3 m (9 ft. 10 1/8 in.)
Plug Gold plated stereo mini plug (for
headphone)
Gold plated mini plug (for microphone)
Mass Approx. 90 g (3.18 oz.) (without cord)
Receiver
Type Open air dynamic
Driver unit 30 mm (1
3
/16 in.) (CCAW Voice Coil),
dome type
Maximum input power
1,000 mW (IEC*
1
)
Impedance 24 Ω at 1 kHz
Sensitivity 100 dB/mW
Reproduction frequency range
40 - 20, 000 Hz
Microphone
Design Flexible Boom microphone
Type Electret condenser
Open circuit voltage level
-40 dB (0 dB = 1 V/Pa)
Effective frequency rage
20 - 20, 000 Hz
Step 1 : Connection
Connect your USB Audio box and computer with the
supplied USB cable.
dedicated USB cable
Notes
•The headset supports the USB 2.0 version
( previously USB 1.1 version. )
•The headset is not guaranteed to operate with a USB
hub or USB extension cable. Use the dedicated USB
cable.
Step 2 : Installing the USB driver
USB drivers are included in operating systems if you
are using Windows 98SE, Me, 2000, and XP. USB
drivers will be installed when the system is connected
to the computer for the first time. Follow the on-screen
instructions to install. For details, refer to the manual
of your computer.
Note
When connecting to different USB ports, you may
have to install USB drivers.
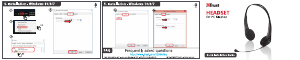
For Windows 98SE
When the system is connected to the computer, [Add
New Hardware Wizard] is displayed and the
installation of the device driver automatically starts.
USB Composite Device, USB Human Interface Device
and USB Audio Device are installed.
Install each USB driver following the on-screen
instructions.
You may need the Windows 98SE CD-ROM to install
the drivers.
The following explains the steps of installing the USB
Composite Device as an example. Install the USB
Human Interface Device and USB Audio Device in the
same way.
1 Check that the [USB Composite Device] is
displayed in the [This wizard searches for
new drivers for:] window, and click [Next].
2 Check that the [Search for the best driver for
your device. (Recommended).]check box is
selected, and click [Next].
3 [Windows will search for new drivers in its
driver database on your hard drive, and in
any of the following selected locations.] is
displayed, and click [Next].
If the Windows 98SE CD-ROM is required, insert it in
the CD-ROM drive and select CD-ROM drive.
4 [Windows driver file search for the device:]
is displayed. check that [USB Composite
Device] is displayed, and click [Next].
5 When [USB Composite Device Windows has
finished installing the software that your
new hardware device requires.] is displayed,
click [Finish].
For Windows Me
When the system is connected to the computer, [Add
New Hardware Wizard] is displayed and the
installation of the device driver automatically starts.
USB Composite Device, USB Human Interface Device
and USB Audio Device are installed.
Install each USB driver following the on-screen
instructions.
The USB Composite Device and USB Human Interface
Device are installed automatically. Install the USB
Audio Device following the steps below.
1 Check that the [USB Audio Device] is
displayed in [Windows has found the
following new hardware:] window, and
check that the [Automatic search for a better
driver (Recommended)] check box is selected
and click [Next].
2 The USB Audio device is installed.
3 When [USB Audio Device Windows has
finished installing the new hardware
device.] is displayed, click [Finish].
For Windows 2000 and XP
When the system is connected to the computer, the
USB Composite Device, USB Human Interface Device
and USB Audio Device are installed automatically.
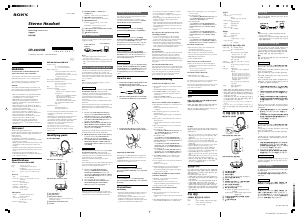
Headset DR-260DP
USB Audio Box UAB-260
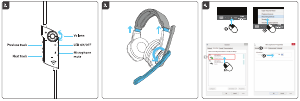
USB Audio Box connection parts
1
2
4
3
5
6
7
8
9
0
1 Ear pad ( Right )
2 Ear pad ( Left )
3 Microphone adjuster
Adjust the position of the microphone by
turning the adjuster.
4 Microphone with wind screen
5 a mark
Setting of music CD replay
This setting is necessary when playing back a music
CD in the CD-ROM drive.
Follow the instructions below according to your
operating system and click the check box of [Enable
digital CD audio for this CD-ROM device].
For Windows 98SE
Click the [Start] menu and select [Settings],
[Control Panel], [Multimedia], and [CD Music].
For Windows Me
Click the [Start] menu and select [Settings],
[Control Panel], [System] and [Device Manager].
Then double-click [CD-ROM] to select the
CD-ROM drive for replaying the music and click
[Properties], and then click [Properties] again.
For Windows 2000
Click the [Start] menu and select [Settings],
[Control Panel], [Sound and Multimedia], and
[Hardware]. Then select the CD-ROM drive for
replaying the music and click [Properties], and
then click [Properties] again.
For Windows XP
Click the [Start] menu and select [Control Panel],
[Sounds, Speech, and Audio Devices], [Sounds
and Audio Devices], and [Hardware]. Then select
the CD-ROM drive for replaying the music and
click [Properties], and then click [Properties]
again.
How to use
1 Connect the headphone plug ( black ) to the
headphone jack and connect the
microphone plug ( pink ) to the microphone
jack.
2 Wear the headset marked R on your right
ear and the one marked L on your left ear.
3Position the microphone in front of your
mouth by turning the Microphone adjuster.
Adjusting the MIC LEVEL
Check the level of MIC LEVEL after recording with
the [Sound Recorder] software pre-installed in your
Windows.
Adjust MIC LEVEL of the USB Audio Box when the
volume level is too high or too low.
For Windows 98SE/Me/2000
Click the [Start] menu, select [Programs],
[Accessories], [Entertainment], and click [Sound
Recorder].
For Windows XP
Click the [Start] menu, select [All Programs],
[Accessories], [Entertainment], and click [Sound
Recorder].
Precautions
On Safety
•Listening with the headphones at high volume may
affect your hearing. For traffic safety, do not use
while driving or cycling.
•Be careful not to use the headphone at too loud a
volume level. Otherwise, you may have audio
feedback (a howling effect) as the microphone picks
up the loud sound from the headphone unit.
USB Audio Box UAB-260
Frequency range
20 - 20,000 Hz (headphone)
100 - 10,000 Hz (microphone)
Input / Output jacks
Output for headphone (mini jack/stereo)
Impedance load : 16 - 40 Ω
Input for microphone (mini jack/monaural)
Plug-in-power system
Dedicated USB jack
Power supply USB bus power compliant (5 V, 100 mA)
Dimensions (excluding projection)
Approx. 53×20×92 mm (w/h/d)
(2
1
/8 ×
3
/4 × 3
5
/8 in.)
Mass Approx. 40 g (1.4 oz.)
Operating environment
Compliant computer :
IBM PC/AT or compatible computers
Compliant OS :
Windows 98 Second Edition/Windows
2000 Professional/Windows
Millennium Edition/ Windows XP
Home Edition/Windows XP
Professional (manufacturer installed)
CPU: Pentium II 266 MHz or better
USB port*
2
Supplied accessories
Dedicated USB cable (1)
Operating instructions (1)
•For the operating environment mentioned above, the
headset is not guaranteed to operate with all
computers.
•The headset is not guaranteed to operate with home
built computers, operating systems that are
personally up-graded or multiple operating systems.
•The headset is not guaranteed to operate with
functions such as system suspend, sleep and
hibernation, on all computers.
*1 IEC (International Electronic Committee) tested.
*2
The USB Audio Box supports USB 2.0. (previously USB 1.1)
Design and specifications are subject to change
without notice.
Identifying parts
•Do not drop your headset or subject it to external
shock, as it may cause a malfunction.
•Do not disassemble or attempt to open any parts of
the system.
•Grasp the plug part of the dedicated USB cable or
headset cord when you disconnect from the
connectors or jacks.
•After operating the headset with the dedicated USB
cable or headset cord, disconnect the USB cable from
the computer if the headset is not to be used for an
extended period.
•Do not use alcohol, benzene, or thinner to clean the
cabinet.
Do not place the system in any of the
following locations.
•Do not leave the system in a location near heat
sources, or in a place subject to direct sunlight,
excessive dust, moisture, rain or mechanical shock.
•Bathroom or other high-humidity locations
•Although this system is magnetically shielded, do
not leave recorded tapes, watches, personal credit
cards or floppy disks using magnetic coding in front
of the system for an extended period of time.
On headset
Act considerately
When the volume is too high, the sound leaks outside
the headset. Be careful not to raise the volume too
high that it bothers people around you. There is a
tendency to raise the volume when using in noisy
places. However, the volume should be kept at a level
where you can respond when called while listening to
the headset.
On ear pads and wind screen
The ear pads and wind screen are replaceable. Replace
them when they are worn out. To replace the ear pads
and wind screen, consult your nearest Sony dealer.
If you have any questions or problems concerning
your system that are not covered in this manual,
please consult your nearest Sony dealer.
Troubleshooting
Sound of the headphone is low.
❒ The headphone plug is not connected to the jack
properly.
c Connect the headphone plug properly.
❒ The Volume Control of your computer or the
volume level of the music playback software is
turned down.
c Adjust the Volume Control.
c Turn up the volume level of the music playback
software.
There is no sound from the headphone.
❒ The dedicated USB cable is not connected to your
computer.
c Connect the dedicated USB cable to your
computer.
❒ The headphone plug is not connected to the
headphone jack.
c Connect the headphone plug to the headphone
jack.
❒ The system is connected while music software is
being replayed.
c Stop playback of the music software and start
again.
❒ The audio replaying device of your computer is
not set correctly.
c For Windows 98SE
Select [Audio] in [Multimedia Properties], and
select [USB Audio Device] for [Preferred
device] in the Playback menu.
c For Windows Me
Select [Audio] in [Sounds and Multimedia
Properties], and select [USB Audio Device] for
[Preferred device] in the Sound Playback menu.
c For Windows 2000
Select [Audio] in [Sounds and Multimedia
Properties], and select [USB Audio Device] for
[Preferred device] in the Sound Playback menu.
c For Windows XP
Select [Audio] in [Sounds and Audio Devices
Properties], and select [USB Audio CODEC] for
[Default device] in the Sound playback menu.
❒ The Volume Control of your computer or the
music playback software etc, is set to MUTE.
c Unset MUTE.
❒ Your computer does not recognize the headset as
a USB device.
c Restart your computer.
❒ The CD-ROM drive of your computer does not
support the digital play function of WDM.
c Use a CD-ROM drive that supports the digital
play function of WDM.
Sound of the headphone and recorded
sound are disrupted.
❒ The CPU of your computer is overloaded.
c Exit other applications.
❒ Other USB devices are connected to your
computer and being operated simultaneously.
c Quit operating other USB devices.
You cannot record sound from the
microphone.
❒ The microphone plug is not connected to the
microphone jack.
c Connect the microphone plug to the microphone
jack.
❒ The MIC MUTING button is set to Muting mode.
c Set the MIC MUTING button to TALK mode.
❒ The audio recording device of your computer is
not set correctly.
c For Windows 98SE
Select [Audio] in [Multimedia Properties], and
select [USB Audio Device] for [Preferred
device] in the Recording menu.
c For Windows Me
Select [Audio] in [Sounds and Multimedia
Properties], and select [USB Audio Device] for
[Preferred device] in the Sound Recording
menu.
c For Windows 2000
Select [Audio] in [Sounds and Multimedia
Properties], and select [USB Audio Device] for
[Preferred device] in the Sound Recording
menu.
c For Windows XP
Select [Audio] in [Sounds and Audio Devices
Properties], and select [USB Audio CODEC] for
[Default device] in the Sound recording menu.
Recorded sound is low.
❒ The microphone plug is not connected to the
microphone jack properly.
c Connect the microphone plug properly.
❒ The microphone is away from your mouth.
c Position the microphone in front of your mouth.
❒ MIC LEVEL is turned down.
c Turn up MIC LEVEL.
There is noise in recorded sound.
❒ There are electrical wires, fluorescent lights or
mobile phones near the headset (especially the
microphone.)
Move away from any possible sources of
electromagnetic interference.
Recorded sound is distorted.
❒ MIC LEVEL is set too high.
c Decrease the level of MIC LEVEL.
For details on the operation of your computer, refer to
the operating instructions of your computer.
There can be some breakdowns that cannot be solved
even with Troubleshooting. In such cases, contact
your nearest Sony dealer.
qa
한국어
경고
화재나 감전의 위험이 있으므로 장치를 비나 습기에
노출되지 않도록 하십시오.
화재나 감전 위험을 예방하기 위해 장치 위에 꽂병과
같이 액체로 채워진 물건을 올려 놓지 마십시오.
캐이스를 열면 감전의 위험이 있습니다. 서비스는 자
격이 있는 기술자에게 의뢰하십시오.
CE 마크
CE 마크의 효력은 법으로 이를 규정한 국가에서만 인
정되며 주로 EEA(유럽 경제 지역) 내의 국가들이 이
에 포함됩니다.
• Microsoft 및 Windows는 미국 및/또는 기타 국가
에서 Microsoft Corporation의 상표 또는 등록
상표입니다.
• IBM 및 PC/AT는 International Business
Machines Corporation의 등록 상표입니다.
• Pentium은 Intel Corporation의 상표 또는 등록
상표입니다.
• 본 설명서에서 Microsoft
®
Windows
®
XP Home
Edition 및 Microsoft
®
Windows
®
XP
Professional은 Windows XP로 표기됩니다.
• 본 설명서에서 Microsoft
®
Windows
®
2000
Professional은 Windows 2000으로 표기됩니다.
• 본 설명서에서 Microsoft
®
Windows
®
Millennium Edition은 Windows Me로 표기됩
니다.
•
본 설명서에서 Microsoft
®
Windows
®
98 Second
Edition은 Windows 98SE로 표기됩니다.
• 다른 모든 시스템, 제품 및 서비스 이름은 해당 소유
자의 상표 또는 등록 상표입니다. 본 설명서에서
TM
및
®
표시는 생략되었습니다.
환영합니다!
Sony DR-260USB 스테레오 헤드셋을 구입해 주셔
서 감사합니다. 장치를 작동하기 전에 이 설명서를 자
세히 읽으십시오. 이 설명서는 나중에 참고할 수 있도
록 잘 보관하십시오.
이 제품의 특징은 다음과 같습니다.
• 편안하게 장시간 사용할 수 있게 디자인되었습니다.
• USB 연결을 통한 디지털 전송으로 컴퓨터의 노이즈
가 차단됩니다.
• USB 오디오 박스 기능을 통해 편리하게 헤드폰 및
마이크 볼륨을 조정하고 음소거할 수 있습니다.
• 유연하게 디자인된 붐 마이크는 노이즈를 줄이고 입
정면으로 마이크 위치를 쉽게 조정할 수 있습니다.
• 헤드폰과 전용 USB 케이블의 코드 길이가 충분하여
컴퓨터의 위치에 관계 없이 어디서나 편리하게 사용
할 수 있습니다.
주요 제원
스테레오 헤드셋 DR-260DP
코드 3m
플러그 금도금 스테레오 소형 플러그(헤드폰용)
금도금 소형 플러그(마이크용)
무게 약 90g(코드 제외)
수신기
종류 Open Air Dynamic
드라이버 장치
30mm
(CCAW 음성 코일), 돔 형식
최대 입력 전원
1000mW(IEC*
1
)
임피던스 1kHz에서 24Ω
감도 100dB/mW
재생 주파수 범위
40 - 20000Hz
마이크
디자인 유연한 붐 마이크
종류 전기 콘덴서
개방 회로 전압 수준
-40dB(0 dB = 1 V/Pa)
유효 주파수 범위
20 - 20000Hz
USB 오디오 박스 UAB-260
주파수 범위 20 - 20000Hz(헤드폰)
100 - 10000Hz(마이크)
입력 / 출력 단자
헤드폰 출력(미니 단자/스테레오)
임피던스 부하 : 16 - 40 Ω
마이크 입력(미니 단자/모노)
플러그인 파워형 시스템
전용 USB 단자
전원 공급 USB 버스 전원 규격(5V, 100mA)
크기(프로젝션 제외)
약 53×20×92mm(너비/높이/깊이)
무게 약 40g
작동 환경 호환 컴퓨터 :
IBM PC/AT 또는 호환 컴퓨터
호환 OS :
Windows 98 Second Edition/
Windows 2000 Professional/
Windows Millennium Edition/
Windows XP Home Edition/
Windows XP Professional
(제조업체 설치)
CPU: Pentium II 266 MHz 이상
USB 포트
*
2
부속품 전용 USB 케이블(1)
사용 설명서(1)
•위에서 설명한 사용 환경을 충족하는 경우에도 일부
컴퓨터에서는 헤드셋이 작동하지 않을 수 있습니다.
•개인이 조립한 컴퓨터, 개인적으로 업그레이드한 운
영 체제 또는 다중 운영 체제에서는 헤드셋이 작동하
지 않을 수도 있습니다.
•시스템 대기 모드, 절전 모드 및 최대 절전 모드와 같
은 기능을 사용하는 경우 일부 컴퓨터에서는 헤드셋
이 작동하지 않을 수도 있습니다.
*1 IEC(International Electronic Committee)에서 테스트되
었습니다.
*2
USB 오디오 박스는 USB 2.0을 지원합니다. (이전에는 USB 1.1)
디자인 및 주요 제원은 사전 통보 없이 변경될 수 있습
니다.
각 부품 명칭 및 위치
1단계: 연결
제공된 USB 케이블을 사용하여 USB 오디오 박스와
컴퓨터를 연결합니다.
전용 USB 케이블
참고
•헤드셋은 USB 2.0 버전을 지원합니다(이전에는
USB 1.1 버전 지원).
•USB 허브 또는 USB 확장 케이블을 사용할 경우 헤
드셋이 작동하지 않을 수도 있습니다. 전용 USB 케
이블을 사용하십시오.
2단계: USB 드라이버 설치
Windows 98SE, Me, 2000 및 XP를 사용하는 경우
운영 체제에 USB 드라이버가 포함되어 있습니다.
USB 드라이버는 시스템을 처음 컴퓨터에 연결할 때
설치됩니다. 화면의 지시에 따라 설치하십시오. 자세
한 내용은 컴퓨터 사용 설명서를 참조하십시오.
참고
다른 USB 포트에 연결할 경우 USB 드라이버를 설치
해야 할 수 있습니다.
Windows 98SE
시스템을 컴퓨터에 연결하면 [새 하드웨어 추가 마법
사]가 표시되고 장치 드라이버 설치가 자동으로 시작
됩니다.
USB 복합 기기, USB 휴먼 인터페이스 장치 및 USB
오디오 장치가 설치됩니다.
화면의 지시에 따라 각 USB 드라이버를 설치하십시
오.
드라이버를 설치하려면 Windows 98SE CD-ROM
이 필요할 수 있습니다.
다음은 USB 복합 기기를 설치하는 단계를 예로 들어
설명합니다. USB 휴먼 인터페이스 장치와 USB 오디
오 장치를 같은 방법으로 설치합니다.
1 [드라이버를 검색할 장치] 창에서 [USB 복합
기기]가 표시되는지 확인하고 [다음]을 클릭합
니다.
2 [장치에 가장 알맞은 드라이버 검색(권장)] 확
인란이 선택되었는지 확인하고 [다음]을 클릭
합니다.
3 [새로운 드라이버를 찾기 위해 시스템의 하드
드라이브의 드라이버 데이터베이스 및 지정한
위치를 검색합니다]가 표시되면 [다음]을 클릭
합니다.
Windows 98SE CD-ROM을 요구하면 CD-ROM
드라이브에 이 디스크를 넣고 CD-ROM 드라이브를
선택하십시오.
4 [드라이버를 찾을 장치]가 표시되면 [USB 복
합 기기]가 표시되는지 확인하고 [다음]을 클
릭합니다.
5 [USB 복합 기기 시스템의 새 하드웨어 장치에
필요한 소프트웨어의 설치를 마쳤습니다]가 표
시되면 [마침]를 클릭합니다.
Windows Me
시스템을 컴퓨터에 연결하면 [새 하드웨어 추가 마법
사]가 표시되고 장치 드라이버 설치가 자동으로 시작
됩니다.
USB 합성 장치, USB 휴먼 인터페이스 장치 및 USB
오디오 장치가 설치됩니다.
화면의 지시에 따라 각 USB 드라이버를 설치하십시
오.
USB 합성 장치 및 USB 휴먼 인터페이스 장치가 자
동으로 설치됩니다. 다음 단계에 따라 USB 오디오
장치를 설치하십시오.
1 [다음 하드웨어를 찾았습니다] 창에 [USB 오
디오 장치]가 표시되는지 확인하고 [더 나은
드라이버 자동 검색(권장)] 확인란이 선택되었
는지 확인하고 [다음]을 클릭합니다.
2 USB 오디오 장치가 설치됩니다.
3 [USB 오디오 장치 새 하드웨어 장치 설치를
마쳤습니다]가 표시되면 [마침]를 클릭합니다.
Windows 2000 및 XP
시스템을 컴퓨터에 연결하면 USB Composite 장치,
USB 휴먼 인터페이스 장치 및 USB 오디오 장치가
자동으로 설치됩니다.
음악 CD 재생 설정
이 설정은 CD-ROM 드라이브에서 음악 CD를 재생
할 때 필요합니다.
운영 체제에 따라 아래의 지시를 따른 다음 [이 CD-
ROM 장치에서 디지털 CD 오디오 사용] 확인란을 클
릭하십시오.
Windows 98SE
[시작] 메뉴를 클릭한 다음 [설정], [제어판], [멀
티미디어] 및 [CD 음악]을 차례로 선택합니다.
Windows Me
[시작] 메뉴를 클릭한 다음 [설정], [제어판], [시
스템] 및 [장치 관리자]를 차례로 선택합니다. 그
런 다음 [CDROM]을 두 번 클릭하여 음악을 재생
할 CD-ROM 드라이브를 선택하고 [등록 정보]를
클릭한 후 [등록 정보] 탭을 클릭합니다.
MIC
MUTING
VOLUME
MIC LEVEL
T
A
L
K
M
U
T
I
N
G
USB 오디오 박스 UAB-260
USB 오디오 박스 연결 부품
1
2
4
3
5
6
7
8
9
0
qa
다음 페이지에서 계속
to the dedicated
USB jack
to the USB port
헤드셋 DR-260DP
6 PHONE VOLUME + / - button ( for
headphone )
Adjust the volume level of the headphone.
7 MIC LEVEL ( for microphone )
Adjust the volume level of the microphone.
8 MIC MUTING button
4 TALK : The microphone is set to TALK
mode.
$ MUTING : The microphone is set to
MUTING mode.
9 m
Microphone jack ( Plug-in-power system )
0 i Headphone jack
qa
Dedicated USB jack
1 이어 패드(오른쪽)
2 이어 패드(왼쪽)
3 마이크 조정기
조정기를 돌려 마이크 위치를 조정합니다.
4 윈드 스크린 장착 마이크
5 a 마크
6 PHONE VOLUME + / - 버튼(헤드폰용)
헤드폰의 볼륨을 조정합니다.
7 MIC LEVEL(마이크용)
마이크의 볼륨을 조정합니다.
8 MIC MUTING 버튼
4 TALK : 마이크가 TALK 모드로 설
정됩니다.
$ MUTING : 마이크가 MUTING 모드로
설정됩니다.
9 m 마이크 단자(플러그인 파워형 시스템)
0 i 헤드폰 단자
qa
전용 USB 단자
전용 USB 잭
전용 USB 단자
(1)


이 제품에 대한 대화 참여
여기서 소니 DR-260USB 헤드셋에 대한 귀하의 생각을 공유할 수 있습니다. 궁금한 점이 있으면 먼저 설명서를 주의 깊게 읽어보세요. 매뉴얼 요청은 문의 양식을 사용하여 수행할 수 있습니다.