
ENGLISH
Introduction
Congratulations on your purchase and welcome to Philips! To fully benet from the
support that Philips offers, register your product at www.philips.com/welcome.
This user manual contains information about the surprising features of this iron and
some tips to make ironing easier and more enjoyable.
This iron is equipped with a special sensor-controlled handle and automatic
energy-saving technology.
While you iron, the sensor in the handle ensures that the iron produces the optimal
amount of steam. As 90% of the energy consumption of an iron is used to create
steam, energy consumption is optimised by optimising the steam output. When
you intuitively put more force on the handle to remove stubborn creases, the iron
automatically produces more steam.
When you do not press the handle, when you lift the iron and when the iron is
standing on its heel or on its soleplate without any movement, the automatic energy-
saving technology limits the steam output to reduce energy consumption.
We hope you enjoy using this iron.
Important
Read this user manual carefully before you use the appliance and save it for future
reference.
Danger
- Never immerse the iron in water.
Warning
- Check if the voltage indicated on the appliance corresponds to the local mains
voltage before you connect the appliance.
- Do not use the appliance if the plug, the mains cord or the appliance itself shows
visible damage, or if the appliance has been dropped or leaks.
- If the mains cord is damaged, you must have it replaced by Philips, a service
centre authorised by Philips or similarly qualied persons in order to avoid a
hazard.
- Never leave the appliance unattended when it is connected to the mains.
- This appliance is not intended for use by persons (including children) with
reduced physical, sensory or mental capabilities, or lack of experience and
knowledge, unless they have been given supervision or instruction concerning
use of the appliance by a person responsible for their safety.
- Children should be supervised to ensure that they do not play with the
appliance.
- Do not let the mains cord come into contact with the hot soleplate of the iron.
- Do not use the appliance if the exible rubber handle parts show visible damage.
Caution
- Only connect the appliance to an earthed wall socket.
- Check the mains cord regularly for possible damage.
- The soleplate of the iron can become extremely hot and may cause burns if
touched.
- When you have nished ironing, when you clean the appliance, when you ll or
empty the water tank and also when you leave the iron even for a short while:
set the steam control to position 0, put the iron on its heel and remove the
mains plug from the wall socket.
- Always place and use the iron on a stable, level and horizontal surface.
- Do not put perfume, vinegar, starch, descaling agents, ironing aids or other
chemicals in the water tank.
- This appliance is intended for household use only.
Electromagnetic elds (EMF)
This Philips appliance complies with all standards regarding electromagnetic elds
(EMF). If handled properly and according to the instructions in this user manual, the
appliance is safe to use based on scientic evidence available today.
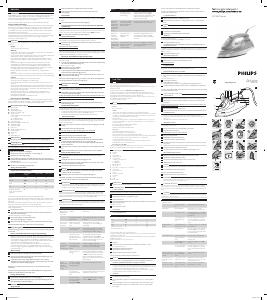
General description (Fig. 1)
A Spray nozzle
B Filling opening
C Cap of lling opening
D Steam boost button ( 9)
E Steam control
- CALC CLEAN = Calc-Clean function
- 0 = no steam
- l = minimum steam
- ; = maximum steam
F Spray button ( 8)
G Red auto-off light (GC3660 only)
H Temperature dial
I Temperature light
J Mains cord
K Flexible rubber handle part
L Anti-Calc tablet
M Water tank
N Heel
Not shown: lling cup
Before first use
1 Removeanysticker,protectivefoilorplasticfromthesoleplate(Fig.2).
Preparing for use
Filling the water tank
Donotputperfume,vinegar,starch,descalingagents,ironingaidsorother
chemicalsinthewatertank.
1 Makesuretheapplianceisunplugged.
2 Setthesteamcontroltoposition0(=nosteam)(Fig.3).
3 Openthecapofthellingopening.
4 Usethellingcuptollthewatertankwithtapwateruptothemaximum
level.TilttheironbackwardstocheckifthewaterlevelhasreachedtheMAX
indication(Fig.4).
Do not ll the water tank beyond the MAX indication.
5 Closethecapofthellingopening(‘click’).
Setting the temperature
Temperature and steam settings
Fabrictype Temperature
setting
Steamsetting Steamboost
Linen MAX ; Yes
Cotton 3 ; Yes
Wool 2 l N.A.
Silk 1 0 N.A.
Synthetic fabrics (e.g.
acrylic, nylon, polyamide,
polyester)
1 0 N.A.
Check the laundry care label for the required ironing temperature.
If you do not know what kind or kinds of fabric an article is made of, determine the
right ironing temperature by ironing a part that is not visible when you wear or use
the article.
Silk, woolen and synthetic materials: iron the reverse side of the fabric to prevent
shiny patches. To prevent stains, do not use the spray function.
Start ironing the articles that require the lowest ironing temperature, such as those
made of synthetic bers.
1 Puttheirononitsheel.
2 Tosettherequiredironingtemperature,turnthetemperaturedialtothe
appropriateposition(Fig.5).
See table ‘Temperature and steam settings’.
3 Putthemainspluginanearthedwallsocket.
, Thetemperaturelightgoeson(Fig.6).
4 Whenthetemperaturelightgoesout,waitawhilebeforeyoustartironing.
Note: The temperature light goes on from time to time during ironing.
Using the appliance
Note: The iron may give off some smoke when you use it for the rst time. This stops after
a short while.
Sensor-controlled handle with energy-saving technology
- While you iron, the sensor in the handle ensures that the iron produces the
optimal amount of steam. As 90% of the energy consumption of an iron is used
to create steam, energy consumption is optimised by optimising the steam
output. When you intuitively put more force on the handle to remove stubborn
creases, the iron automatically produces more steam.
- When you do not press the handle, when you lift the iron and when the
iron is standing on its heel or on its soleplate without any movement, the
automatic energy-saving technology limits the steam output to reduce energy
consumption (Fig. 7).
Steam ironing
1 Makesurethatthereisenoughwaterinthewatertank.
2 Settherecommendedironingtemperature(seechapter‘Preparingforuse’,
table‘Temperatureandsteamsettings’).
3 Settheappropriatesteamsetting.Makesurethatthesteamsettingis
suitableforthesetironingtemperature(seechapter‘Preparingforuse’,table
‘Temperatureandsteamsettings’)(Fig.8).
Note: The iron is ready for steam ironing as soon as it has reached the set ironing
temperature.
Note: If the set ironing temperature is too low (MIN to 2), water may drip from the
soleplate (see chapter ‘Features’, section ‘Drip stop’).
Ironing without steam
1 Setthesteamcontroltoposition0(=nosteam)(Fig.3).
2 Settherecommendedironingtemperature(seechapter‘Preparingforuse’,
table‘Temperatureandsteamsettings’).
Features
Spray function
You can use the spray function to remove stubborn creases at any temperature.
GC3600 Series
1 Makesurethatthereisenoughwaterinthewatertank.
2 Pressthespraybuttonseveraltimestomoistenthearticletobe
ironed(Fig.9).
Steam boost
A powerful steam boost helps to remove very stubborn creases.
The steam boost function can only be used at temperature settings between 3
and MAX.
1 Pressandreleasethesteamboostbutton(Fig.10).
Concentrated steam boost from the special Steam Tip (GC3640/
GC3660 only)
The concentrated steam boost from the long vents in the Steam Tip enhances the
distribution of steam into every part of your garment. The concentrated steam boost
function can only be used at temperature settings between 3 and MAX.
1 Pressandreleasethesteamboostbutton(Fig.11).
Vertical steam boost
You can also use the steam boost function when you hold the iron in vertical position.
This is useful for removing creases from hanging clothes, curtains etc.
1 Holdtheironinverticalpositionandpressandreleasethesteamboost
button(Fig.12).
Neverdirectthesteamatpeople.
Drip stop
This iron is equipped with a drip-stop function: the iron automatically stops producing
steam when the temperature is too low, to prevent water from dripping out of the
soleplate. When this happens, you may hear a sound.
Automatic shut-off function (specic types only)
The automatic shut-off function automatically switches off the iron if it has not been
moved for a while.
, Theredauto-offlightashestoindicatethattheironhasbeenswitchedoffby
theautomaticshut-offfunction(Fig.13).
To let the iron heat up again:
1 Pickuptheironormoveitslightly
, Theredauto-offlightgoesout.
, Ifthetemperatureofthesoleplatehasdroppedbelowthesetironing
temperature,thetemperaturelightgoeson.
2 Ifthetemperaturelightgoesonafteryouhavemovedtheiron,waitforitto
gooutbeforeyoustartironing.
Note: If the temperature light does not go on after you move the iron, the soleplate still
has the right temperature and the iron is ready for use.
Cleaning and maintenance
Cleaning
1 Setthesteamcontroltoposition0,removethemainsplugfromthewall
socketandlettheironcooldown.
2 Wipeakesandanyotherdepositsoffthesoleplatewithadampclothanda
non-abrasive(liquid)cleaningagent.
Tokeepthesoleplatesmooth,avoidhardcontactwithmetalobjects.Neverusea
scouringpad,vinegarorotherchemicalstocleanthesoleplate.
3 Cleantheupperpartoftheironwithadampcloth.
4 Regularlyrinsethewatertankwithwater.Emptythewatertankafteryou
haverinsedit(Fig.14).
Double-Active Calc System
The Double-Active Calc System consists of an Anti-Calc tablet inside the water tank
combined with the Calc-Clean function.
1 The Anti-Calc tablet prevents scale from clogging the steam vents. This tablet is
constantly active and does not need to be replaced (Fig. 15).
2 The Calc-Clean function removes the scale particles from the iron.
Calc-Clean function
Use the Calc-Clean function once every two weeks. If the water in your area is very
hard (i.e. when akes come out of the soleplate during ironing), use the Calc-Clean
function more frequently.
1 Setthesteamcontroltoposition0andremovethemainsplugfromthewall
socket.
2 Fillthewatertanktothemaximumlevel.
Donotpourvinegarorotherdescalingagentsinthewatertank.
3 SetthetemperaturedialtoMAX.
4 Putthemainspluginanearthedwallsocket.
5 Unplugtheironwhenthetemperaturelightgoesout.
6 Holdtheironoverthesink.PushthesteamcontroltotheCALCCLEAN
positionandholdit.Gentlyshaketheirontoandfro(Fig.16).
, Steamandboilingwatercomeoutofthesoleplate.Impuritiesandakes(if
any)areushedout.
7 Releasethesteamcontrolassoonasallthewaterinthetankhasbeenused
up.
8 RepeattheCalc-Cleanprocessiftheironstillcontainsalotofimpurities.
After the Calc-Clean process
1 Puttheplugbackintothewallsocketandlettheironheatuptoletthe
soleplatedry.
2 Unplugtheironwhenthetemperaturelightgoesout.
3 Movetheirongentlyoverapieceofusedclothtoremoveanywaterstains
thatmayhaveformedonthesoleplate.
4 Lettheironcooldownbeforeyoustoreit.
Storage
1 Setthesteamcontroltoposition0,removethemainsplugfromthewall
socketandlettheironcooldown.
2 Windthemainscordroundthecordstoragefacility(Fig.17).
Note: Make sure that the mains cord does not press down the handle during storage.
3 Storetheirononitsheelinasafeanddryplace.
Environment
- Do not throw away the appliance with the normal household waste at the end
of its life, but hand it in at an ofcial collection point for recycling. By doing this,
you help to preserve the environment (Fig. 18).
Guarantee & service
If you need service or information or if you have a problem, please visit the Philips
website at www.philips.com or contact the Philips Consumer Care Centre in your
country (you nd its phone number in the worldwide guarantee leaet). If there is no
Consumer Care Centre in your country, go to your local Philips dealer.
Troubleshooting
This chapter summarises the most common problems you could encounter with the
appliance. If you are unable to solve the problem with the information below, contact
the Consumer Care Centre in your country.
Problem Possiblecause Solution
The iron is
plugged in, but
the soleplate
stays cold.
There is a connection
problem.
Check the mains cord, the plug and the
wall socket.
The temperature dial
is set to MIN.
Set the temperature dial to the required
position.
The iron does
not produce
any steam.
There is not enough
water in the water
tank.
Fill the water tank (see chapter
‘Preparing for use’, section ‘Filling the
water tank).
The steam control is
set to position 0.
Set the steam control to l or ;
(see chapter ‘Preparing for use’, table
‘ Temperature and steam settings’).
The iron is not hot
enough and/or the
drip-stop function has
been activated.
Set an ironing temperature that is
suitable for steam ironing ( 2 to
MAX). Put the iron on its heel and wait
until the temperature light goes out
before you start ironing.
The steam
boost function
does not
work properly.
You used the steam
boost function too
often within a short
period.
Continue ironing in horizontal
position and wait a while before you use
the steam boost function again..
The iron is not hot
enough.
Set an ironing temperature at which
the steam boost function can be used
( 3 to MAX). Put the iron on its
heel and wait until the temperature
light goes out before you use the steam
boost function.
Water
droplets drip
onto the
fabric during
ironing
You have not closed
the cap of the lling
opening properly.
Press the cap until you hear a click.
You have put an
additive in the water
tank.
Rinse the water tank and do not put any
additive in the water tank.
You have used the
steam boost function
at a temperature
setting below 3.
Set the temperature dial to a setting
between 3 and MAX
Problem Possiblecause Solution
You have set a too
low temperature for
steam ironing.
Set an ironing temperature that is
suitable for steam ironing ( 2 to
MAX). Put the iron on its heel and wait
until the temperature light goes out
before you start ironing
Water drips
from the
soleplate after
the iron has
cooled down
or has been
stored.
You have put the iron
in horizontal position
with water still left in
the water tank.
Empty the water tank before you store
the iron. Store the iron on its heel.
Flakes and
impurities
come out of
the soleplate
during ironing.
Hard water forms
akes inside the
soleplate.
Use the Calc-Clean function one or
more times (see chapter ‘Cleaning
and maintenance’, section ‘Calc-Clean
function’).
The red auto-
off light ashes
(specic types
only).
The automatic shut-off
function has switched
off the iron (see
chapter ‘Features’).
Move the iron slightly to deactivate the
automatic shut-off function. The red
auto-off light goes out.
4239.000.7185.2www.philips.com
u
D F I
J
L
K
B
C
A
M
N
E G H
1
ภาษาไทย
บทนำา
ขอแสดงความยินดีที่คุณสั่งซื้อและยินดีตอนรับสผลิตภัณฑของ Philips! เพื่อใหคุณไดรับประโยชนอยางเต็มที่จากบริการที่
Philips มอบให โปรดลงทะเบียนผลิตภัณฑของคุณที่ www.philips.com/welcome
ในคมือการใชงานนี้มีขอมูลเกี่ยวกับคุณสมบัติที่คุณคาดไมถึงของเตารีดระบบนี้ รวมทั้งเคล็ดลับที่จะชวยใหการรีดผาเปนงานที่
ไมนาเบื่อและงายดายยิ่งขึ้น
เตารีดนี้มีเซนเซอรพิเศษควบคุมที่จับและมี เทคโนโลยีการประหยัดพลังงาน อัตโนมัติ
ขณะที่คุณรีดผา เซนเซอรบนที่จับจะดำาเนินการใหเตารีดสรางพลังไอนใหมีปริมาณเหมาะสมที่สุด เนื่องจาก 90% ขอ
งการใชพลังงานของเตารีดหมดไปกับการสรางไอน การใชพลังงานใหเหมาะสมที่สุดทำาไดโดยการใชพลังงานไอนใหเหมาะ
สมเชนกัน เมื่อคุณเริ่มเรงพลังเตารีดเพื่อขจัดรอยยับที่รีดยาก เตารีดจะสรางพลังไอนมากขึ้น
เมื่อคุณไมไดกดที่จับ เมื่อคุณยกเตารีดและเมื่อตั้งเตารีดขึ้นหรือเมื่อแผนความรอนไมมีการเคลื่อนไหว เทคโนโลยีการประหยัด
พลังงานอัตโนมัติจะจำากัดพลังงานไอนเพื่อลดการใชพลังงาน
เราหวังวาคุณจะเพลิดเพลินกับการใชเตารีดนี้
ขอควรจำา
ควรอานคมืออยางละเอียดกอนใชงานและเก็บไวเพื่อใชอางอิงในครั้งตอไป
อันตราย
- ไมควรนำาเตารีดจมลงในน
คำาเตือน
- กอนใชงานโปรดตรวจสอบแรงดันไฟที่ระบุบนผลิตภัณฑวาตรงกับแรงดันไฟที่ใชภายในบานหรือไม
- หามใชงานเตารีดหากพบวาปลั๊กไฟ สายไฟ หรือตัวเครื่องเกิดชำารุดเสียหาย, หรือหากเตารีดไอนตกกระแทกหรือมีรอยรั่ว
- หากสายไฟชำารุด ควรนำาไปเปลี่ยนที่บริษัทฟลิปส หรือศูนยบริการที่ไดรับอนุญาตจากฟลิปส หรือบุคคลที่ผานการอบรม
จากฟลิปสดำาเนินการเปลี่ยนให เพื่อหลีกเลี่ยงอันตรายที่อาจเกิดขึ้นได
- หามเสียบปลั๊กไฟทิ้งไว
- ไมควรใหบุคคล (รวมทั้งเด็กเล็ก) ที่มีสภาพรางกายไมแข็งแรงหรือสภาพจิตใจไมปกติ หรือขาดประสบการณและความ
รความเขาใจ นำาผลิตภัณฑนี้ไปใชงาน เวนแตจะอยในการควบคุมดูแลหรือไดรับคำาแนะนำาในการใชงานโดยผที่รับผิด
ชอบในดานความปลอดภัย
- เด็กเล็กควรไดรับการดูแลเพื่อปองกันไมใหเด็กนำาผลิตภัณฑนี้ไปเลน
- ไมควรใหสายไฟสัมผัสโดนแผนความรอนของเตารีด
- หามใชเครื่องหากสวนที่จับที่เปนยางยืดหยนไดชำารุดเสียหาย
ขอควรระวัง
- เสียบปลั๊กไฟเขากับเตารับที่ตอสายดินไวเรียบรอยแลวเทานั้น
- หมั่นตรวจสอบสายไฟใหอยในสภาพปกติ เพื่อหลีกเลี่ยงการชำารุด
- แผนความรอนของเตารีดมีความรอนสูง อาจทำาใหผิวหนังไหมพองไดหากสัมผัสโดน
- เมื่อรีดผาเสร็จ เมื่อทำาความสะอาดเตารีด เมื่อเติมนหรือเทนที่อยในชองเก็บนออก และเมื่อทิ้งเตารีดที่เสียบปลั๊กแลวไป
ทำาธุระอื่นชวงสั้นๆ ใหเลื่อนปุ่มควบคุมไอนมาที่ตำาแหนง 0 ตั้งเตารีดรอไว และถอดปลั๊กเตารีดออก
- วางและใชงานเตารีดบนพื้นที่เรียบและมั่นคงเทานั้น
- หามใสนหอม, นสมสายชู, แปง, สารขจัดตะกรัน, ผลิตภัณฑสำาหรับรีดผาหรือสารเคมีอื่นๆ ลงในแทงคน
- เครื่องใชไฟฟานี้เหมาะสำาหรับการใชงานในครัวเรือนเทานั้น
Electromagnetic fields (EMF)
ผลิตภัณฑของฟลิปสไดมาตรฐานดานคลื่นแมเหล็กไฟฟา (EMF) หากมีการใชงานอยางเหมาะสมและสอดคลองกับคำาแนะนำา
ในคมือนี้ คุณสามารถใชผลิตภัณฑไดอยางปลอดภัยตามขอพิสูจนทางวิทยาศาสตรในปจจุบัน
สวนประกอบ (รูปที่ 1)
A หัวฉีดสเปรย
B ชองเติมน
C ฝาครอบชองเติมน
D ปุ่มเพิ่มพลังไอน (
9)
E ปุ่มควบคุมพลังไอน
- การขจัดตะกรัน = ฟงกชันขจัดตะกรัน
- 0 = ไมมีพลังไอน
- l = พลังไอนนอย
- ; = พลังไอนสูงสุด
F ปุ่มสเปรย ( 8)
G สัญญาณไฟ Auto-off สีแดง (เฉพาะรน GC3660 เทานั้น)
H ปุ่มปรับอุณหภูมิ
I สัญญาณไฟแสดงอุณหภูมิ
J สายไฟ
K สวนที่จับที่เปนยางยืดหยนได
L สารขจัดตะกรัน
M แทงคน
N ฐานตั้ง
ไมมีภาพแสดง: ฝาเติมน
กอนใชงานครั้งแรก
1 ลอกสติ๊กเกอร, แผนฟอยลหรือพลาสติกที่หมแผนความรอนออก (รูปที่ 2)
การเตรียมตัวกอนใชงาน
การเติมนลงในแทงค
หามใสนหอม, นสมสายชู, แปง, สารขจัดตะกรัน, ผลิตภัณฑสำาหรับรีดผาหรือสารเคมีอื่นๆ ลงในแทงคน
1 ควรถอดปลั๊กไฟออกกอน
2 ปรับปุ่มควบคุมไอนไปที่ตำาแหนง 0 (=ไมมีพลังไอน) (รูปที่ 3)
3 เปดฝาครอบชองเติมนออก
4 เติมนลงในแทงคใหถึงขีดสูงสุดโดยใชถวยเติมน เอียงเตารีดไปดานหลังเพื่อตรวจดูวาระดับนมีปริมาณถึง
ขีดแสดงระดับสูงสุด (รูปที่ 4)
หามเติมนสูงกวาระดับ MAX
5 ปดฝาครอบชองเติมน (‘ดังคลิก’)
การตั้งอุณหภูมิ
การตั้งคาอุณหภูมิและไอน
ประเภทของเนื้อผา การตั้งคาอุณหภูมิ การตั้งคาพลังไอน เพิ่มพลังไอน
ลินิน MAX
;
มี
ผาฝาย 3 ; มี
ผาขนสัตว 2 l ไมมี
ผาไหม 1 0 ไมมี
ผาใยสังเคราะห (เชน อะคริลิก,
ไนลอน, โพลีอะไมด, โพลีเอสเตอร)
1 0 ไมมี
โปรดตรวจดูปายบนเสื้อผา เพื่อใหทราบถึงอุณหภูมิที่เหมาะสมในการรีด
หากคุณไมทราบชนิดของเสนใยหรือเนื้อผา ใหเลือกอุณหภูมิที่ถูกตองในการรีด ดวยการลองรีดสวนใดสวนหนึ่งของเสื้อผาตัวนั้น
ณ จุดที่ไมสามารถมองเห็นไดขณะสวมใส
ผาไหม, ผาขนสัตว และผาใยสังเคราะห: ควรกลับดานเนื้อผารีดเพื่อปองกันไมใหเนื้อผาขึ้นเงา หลีกเลี่ยงการใชสเปรยเพื่อหลีก
เลี่ยงไมใหเกิดรอยดางบนเนื้อผา
โปรดเริ่มรีดจากผาที่ไมตองการความรอนสูง เชน ผาใยสังเคราะห
1 ตั้งเตารีดขึ้น
2 ปรับปุ่มควบคุมระดับความรอนไปยังระดับที่เหมาะสม เพื่อตั้งอุณหภูมิการรีดที่ตองการ (รูปที่ 5)
โปรดดูตาราง ‘การตั้งคาอุณหภูมิและไอน’
3 เสียบปลั๊กไฟในเตารับที่ตอสายดินไวเรียบรอยแลว
, สัญญาณไฟแสดงอุณหภูมิจะสวางขึ้น (รูปที่ 6)
4 เมื่อสัญญาณไฟแสดงอุณหภูมิดับลง รอสักครกอนเริ่มรีดผา
หมายเหตุ: ขณะรีดผาสัญญาณไฟแสดงอุณหภูมิจะสวางตลอดการใชงาน
การใชงาน
หมายเหตุ: อาจมีควันออกจากเตารีดเมื่อใชเตารีดเปนครั้งแรก ควันจะหายไปเองเมื่อเวลาผานไประยะหนึ่ง
เซนเซอรควบคุมที่จับพรอมเทคโนโลยีการประหยัดพลังงานอัตโนมัติ
- ขณะที่คุณรีดผา เซนเซอรบนที่จับจะดำาเนินการใหเตารีดสรางพลังไอนใหมีปริมาณเหมาะสมที่สุด เนื่องจาก 90% ขอ
งการใชพลังงานของเตารีดหมดไปกับการสรางไอน การใชพลังงานใหเหมาะสมที่สุดทำาไดโดยการใชพลังงานไอนใหเห
มาะสมเชนกัน เมื่อคุณเริ่มเรงพลังเตารีดเพื่อขจัดรอยยับที่รีดยาก เตารีดจะสรางพลังไอนมากขึ้น
- เมื่อคุณไมไดกดที่จับ เมื่อคุณยกเตารีดและเมื่อตั้งเตารีดขึ้นหรือเมื่อแผนความรอนไมมีการเคลื่อนไหว เทคโนโลยีการ
ประหยัดพลังงานอัตโนมัติจะจำากัดพลังงานไอนเพื่อลดการใชพลังงาน (รูปที่ 7)
เตารีดไอน
1 ตรวจสอบใหแนใจวามีนในแทงคเพียงพอ
2 เลือกระดับอุณหภูมิที่แนะนำา (ดูไดจากบท ‘การเตรียมตัวกอนใชงาน’, ในตาราง ‘การตั้งคาอุณหภูมิและ
ไอน’)
3 กำาหนดการตั้งคาพลังไอนตามความเหมาะสม ตรวจดูใหแนใจวาการเลือกระดับไอนนั้นเหมาะสมกับ
อุณหภูมิการรีดผาที่ตั้งคาไว (ดูไดจากบท ‘การเตรียมตัวกอนใชงาน’, ในตาราง ‘การตั้งคาอุณหภูมิและ
ไอน’) (รูปที่ 8)
หมายเหตุ: เตารีดจะพรอมสำาหรับการรีดผาโดยใชพลังไอนเมื่อเตารีดมีอุณหภูมิตามระดับที่ตั้งไว
หมายเหตุ: หากอุณหภูมิที่เลือกไวตเกินไป (MIN ถึง 2) อาจมีนหยดจากแผนทำาความรอนได (ดูไดจากบท
‘คุณสมบัติ’ หัวขอ ‘ระบบปองกันนหยด’)
การรีดโดยไมใชพลังไอน
1 ปรับปุ่มควบคุมไอนไปที่ตำาแหนง 0 (=ไมมีพลังไอน) (รูปที่ 3)
2 เลือกระดับอุณหภูมิที่แนะนำา (ดูไดจากบท ‘การเตรียมตัวกอนใชงาน’, ในตาราง ‘การตั้งคาอุณหภูมิและ
ไอน’)
คุณสมบัติ
สเปรย
สามารถใชงานฟงกชั่นสเปรย เพื่อขจัดรอยยับที่ยากตอการรีดไดดวยอุณหภูมิที่ตองการ
1 ตรวจสอบใหแนใจวามีนในแทงคเพียงพอ
2 กดปุ่มสเปรยหลายๆ ครั้งเพื่อใหเนื้อผาชื้นพอกอนลงมือรีด (รูปที่ 9)
เพิ่มพลังไอน
ปุ่มเรงพลังไอนชวยขจัดรอยยับที่รีดยาก
สามารถใชงานฟงกชั่นไอนพิเศษเมื่อตั้งอุณหภูมิไวที่ 3 และ MAX เทานั้น
1 กดแลวปลอยปุ่มเพิ่มพลังไอน (รูปที่ 10)
การเพิ่มพลังไอนปริมาณสูงจากปลายแผนความรอน Steam Tip ชนิดพิเศษ (เฉพาะรน
GC3640/GC3660 เทานั้น)
การเพิ่มพลังไอนปริมาณสูงจากทอสงไอนที่มีความยาวในสวนที่เปนปลายแผนความรอน Steam Tip นั้น จะชวยกระจายละ
อองไอนใหแทรกซึมเขาถึงทุกอณูของเสนใยผา สามารถใชงานฟงกชั่นการเพิ่มพลังไอนปริมาณสูงนี้ได เมื่อตั้งอุณหภูมิไวที่
3 และ MAX เทานั้น
1 กดแลวปลอยปุ่มเพิ่มพลังไอน (รูปที่ 11)
พลังไอนสำาหรับรีดในแนวตั้ง
นอกจากนี้คุณยังสามารถใชฟงกชั่นเพิ่มพลังไอนในขณะที่ถือเตารีดในแนวตั้ง เพื่อขจัดรอยยับของเสื้อผาที่แขวน ผามาน ฯลฯ
1 ใหถือเตารีดในแนวตั้ง จากนั้นกดและปลอยปุ่มเพิ่มพลังไอน (รูปที่ 12)
หามหันไอนไปในทิศทางที่มีคน
ระบบปองกันนหยด
เตารีดรนนี้ติดตั้งฟงกชั่นปองกันนหยด: เตารีดจะหยุดสรางไอนโดยอัตโนมัติ เมื่ออุณหภูมิตเกินไป เพื่อปองกันไมใหนหยด
ออกมาจากแผนความรอน โดยคุณอาจไดยินเสียงดังขึ้น เมื่อเตารีดเขาสฟงกชั่นการทำางานนี้
ฟงกชั่นตัดไฟอัตโนมัติ (เฉพาะบางรนเทานั้น)
ฟงกชั่นตัดไฟอัตโนมัติจะปดการทำางานของเตารีดทันที หากทิ้งปลอยเตารีดทิ้งไวเปนเวลานาน
, สัญญาณไฟ Auto-off สีแดงจะกะพริบเพื่อแสดงวาเตารีดไดปดการทำางานดวยระบบตัดไฟอัตโนมัติ (รูป
ที่ 13)
ถาตองการทำาใหเตารีดรอนขึ้นอีกครั้ง:
1 ยกเตารีดหรือขยับเตารีดเล็กนอย
, สัญญาณไฟสีแดง AUTO-OFF ดับลง
, หากอุณหภูมิของแผนความรอนตลงกวาคาอุณหภูมิที่ตั้งไว สัญญาณไฟแสดงอุณหภูมิจะสวาง
2 หากสัญญาณไฟอุณหภูมิสวางขึ้นหลังจากที่คุณรีดเตารีดไปมา ควรรอใหไฟดับกอนจึงทำาการรีดครั้งตอไป
หมายเหตุ: หากสัญญาณไฟอุณหภูมิไมสวางหลังจากรีดเตารีดไปมา แสดงวาแผนความรอน รอนถึงระดับอุณหภูมิที่
เหมาะสมแลวและพรอมสำาหรับการใชงาน
การทำาความสะอาดและการบำารุงรักษา
การทำาความสะอาด
1 ตั้งคาปุ่มควบคุมไอนไปที่ตำาแหนง 0 แลวดึงปลั๊กไฟออกจากเตารับบนผนัง จากนั้นปลอยใหเตารีดเย็นลง
2 ใชผาหมาดชุบนยาทำาความสะอาด (ชนิดเหลว) ที่ไมมีฤทธิ์กัดกรอนเช็ดตะกรันและคราบอื่นใดออกจาก
แผนความรอน
เพื่อใหแผนความรอนเรียบลื่น ควรหลีกเลี่ยงการสัมผัสที่รุนแรงกับโลหะ ไมควรใชแผนใยขัดถู, นสมสายชู หรือ
สารเคมีใดๆ ทำาความสะอาดแผนความรอน
3 ทำาความสะอาดสวนบนของเตารีดดวยผาชุบนหมาดๆ
4 ควรลางแทงคนดวยนสะอาดเปนประจำา โดยเทนออกจากแทงคหลังจากลางเสร็จเรียบรอยแลว (รูปที่ 14)
ระบบขจัดตะกรัน 2 ชั้น
ระบบขจัดตะกรัน Double-Active ประกอบดวยเม็ดยาขจัดตะกรันภายในแทงคนที่มีฟงกชั่นขจัดคราบตะกรัน
1 สารขจัดตะกรันจะชวยปองกันไมใหชองไอนอุดตัน สารขจัดตะกรันนี้จะทำางานไดอยางตอเนื่องโดยไมจำาเปนตอง
เปลี่ยน (รูปที่ 15)
2 ฟงกชั่นขจัดคราบตะกรันชวยขจัดคราบตะกรันใหหมดไปจากเตารีด
ฟงกชั่นขจัดคราบตะกรัน
ใชฟงกชั่นขจัดตะกรันทุก 2 สัปดาห หากนที่ใชมีความกระดางมาก (คือ มีแผนคราบบางๆ หลุดออกมาจากแผนความรอนขณะ
รีดผา) ใหใชฟงกชั่นขจัดตะกรันบอยครั้งขึ้น
1 ตั้งคาปุ่มควบคุมไอนไปที่ตำาแหนง 0 แลวดึงปลั๊กไฟออกจากเตารับบนผนัง
2 เติมนลงในแทงคนจนถึงระดับสูงสุด
หามเทนสมสายชูหรือนยาขจัดคราบตะกรันอื่นๆ ลงในแทงคน
3 ปรับปุ่มควบคุมอุณหภูมิไปที่ MAX
4 เสียบปลั๊กไฟในเตารับที่ตอสายดินไวเรียบรอยแลว
5 ถอดปลั๊กไฟออก เมื่อสัญญาณไฟแสดงอุณหภูมิดับลง
6 ถือเตารีดขึ้นเหนืออาง ดันปุ่มควบคุมไอนไปที่ตำาแหนงการขจัดตะกรันและคางไว แลวคอยๆ เขยาเตารีด
ไปมา (รูปที่ 16)
, ไอนและนรอนจะออกมาจากแผนทำาความรอน คราบสกปรกและเศษตะกรัน (ถามี) จะถูกชะลางออกมา
7 คลายปุ่มควบคุมไอนที่กดคางไวทันทีเมื่อนในแทงคหมด
8 ทำาตามขั้นตอนขจัดคราบตะกรันซอีกครั้ง หากเตารีดยังมีคราบสิ่งสกปรกอยเปนจำานวนมาก
หลังจากใชขั้นตอนขจัดคราบตะกรัน
1 เสียบปลั๊กเตารีดเขากับเตารับบนผนัง แลวปลอยใหเตารีดรอนขึ้นจน แผนความรอนแหง
2 ถอดปลั๊กไฟออก เมื่อสัญญาณไฟแสดงอุณหภูมิดับลง
3 เลื่อนเตารีดลงบนเศษผาที่ไมใชแลว เพื่อขจัดคราบนที่เกาะบนแผนความรอน
4 ปลอยใหเตารีดเย็นลงกอนทำาการจัดเก็บเขาที่
การจัดเก็บ
1 ตั้งคาปุ่มควบคุมไอนไปที่ตำาแหนง 0 แลวดึงปลั๊กไฟออกจากเตารับบนผนัง จากนั้นปลอยใหเตารีดเย็นลง
2 มวนสายไฟเพื่อจัดเก็บไวในชองเก็บสายไฟ (รูปที่ 17)
หมายเหตุ: ตรวจดูวาสายไฟไมกดทับบนที่จับขณะจัดเก็บ
3 ควรจัดเก็บเตารีดในแนวตั้งแลววางในที่ปลอดภัยและแหง
สภาพแวดลอม
- หามทิ้งผลิตภัณฑนี้รวมกับขยะในครัวเรือนทั่วไป เมื่อหมดอายุการใชงานแลว ควรทิ้งลงในถังขยะสำาหรับนำากลับไปใช
ใหมได (รีไซเคิล) เพื่อชวยรักษาสภาวะสิ่งแวดลอมที่ดี (รูปที่ 18)
การรับประกันและการบริการ
หากคุณตองการขอรับบริการหรือตองการทราบขอมูล โปรดเขาชมเว็บไซตของ Philips ไดที่ www.philips.com หรือติดตอ
ศูนยบริการดูแลลูกคาของบริษัท Philips ในประเทศของคุณ (หมายเลขโทรศัพทของศูนยบริการฯ อยในเอกสารแผนพับเกี่ยว
กับการรับประกันทั่วโลก) หากในประเทศของคุณไมมีศูนยบริการ โปรดติดตอตัวแทนจำาหนายผลิตภัณฑของบริษัท Philips ใน
ประเทศ
การแกปญหา
ในหัวขอนี้ไดรวบรวมปญหาทั่วไปที่เกี่ยวกับเตารีดซึ่งคุณอาจพบได หากยังไมสามารถแกไขปญหาตามขอมูลดานลางที่ใหมาได
กรุณาติดตอศูนยบริการลูกคาในประเทศของคุณ
ปญหา สาเหตุ การแกปญหา
เสียบปลั๊กไฟเตารีดเรียบรอยแล
ว แตแผนความรอนไมรอน
มีปญหาเกี่ยวกับการตอสายไฟ ตรวจสอบสายไฟ ปลั๊ก และเตารับบนผนัง
ปุ่มควบคุมอุณหภูมิตั้งอยที่
MIN
ปรับปุ่มควบคุมอุณหภูมิไปยังตำาแหนงที่ตองการ
เตารีดไมผลิตไอน มีนในแทงคไมเพียงพอ เติมนในแทงคน (ดูที่บท ‘การเตรียม
การกอนใชงาน’ ในสวน ‘การเติมนในแทงคน’)
ปุ่มควบคุมพลังไอนอยที่ 0 เลือกการตั้งคาพลังไอนไวที่ l หรือ ; (ดูไดจาก
บท ‘การเตรียมตัวกอนใชงาน’, ในตาราง ‘การตั้งคา
อุณหภูมิและไอน’)
เตารีดรอนไมเพียงพอ และ/
หรือเปดใชฟงกชันควบคุม
หยดน
ตั้งอุณหภูมิการรีดที่อุณหภูมิที่เหมาะสมสำาหรับก
ารรีดดวยไอน ( 2 จนถึง MAX) ตั้งเตารีดขึ้น
รอจนกระทั่งสัญญาณไฟแสดงอุณหภูมิดับลงกอน
เริ่มรีดผา
ฟงกชั่นเพิ่มพลังไอนทำางา
นผิดปกติ
คุณใชฟงกชั่นเพิ่มพลังไอนบอ
ยเกินไปภายในระยะเวลาสั้นๆ
ควรรีดในตำาแหนงแนวนอนสักระยะ กอนใชฟงกชัน
พลังไอนพิเศษอีกครั้ง..
เตารีดรอนไมเพียงพอ ตั้งคาอุณหภูมิการรีดที่สามารถใชงานฟงกชั่นเพิ่ม
พลังไอนได ( 3 จนถึง MAX) ตั้งเตารีดขึ้น
แลวรอจนกระทั่งสัญญาณไฟอุณหภูมิดับลงกอนเริ่ม
ใชงานฟงกชั่นเพิ่มพลังไอน
นหยดลงบนเนื้อผาขณะรีดผา คุณปดฝาปดชองเติมนไมสนิท กดฝาปดที่ชองเติมนลง จนไดยินเสียงดังคลิก
คุณไดเติมสารเพิ่มเติมลงใน
แทงคน
ทำาความสะอาดแทงคน และหามเติมนยาชวยการ
รีดผาใดลงในแทงคน
คุณใชฟงกชั่นเพิ่มพลังไอนที่อุ
ณหภูมิตกวา 3
ปรับปุ่มควบคุมอุณหภูมิไปที่คาระหวาง 3
และ MAX
คุณปรับอุณหภูมิตเกินไปสำาห
รับการรีดผาโดยใชพลังไอน
ตั้งอุณหภูมิการรีดที่อุณหภูมิที่เหมาะสมสำาหรับก
ารรีดดวยไอน ( 2 จนถึง MAX) ตั้งเตารีดขึ้น
รอจนกระทั่งสัญญาณไฟแสดงอุณหภูมิดับลงกอน
เริ่มรีดผา
นหยดออกมาจากแผนความรอ
นหลังจากเตารีดเย็นลงหรือหลังจ
ากเก็บเตารีด
คุณอาจวางเตารีดในแนวนอ
นในขณะที่มีนเหลืออยใน
แทงคน
เทนออกจากแทงคกอนจัดเก็บเตารีด เก็บเตารีด
ในแนวตั้ง
ขณะรีดผา มีคราบตะกรันและ
สิ่งสกปรกหลุดออกมาจากแผน
ความรอน
นกระดางทำาใหคราบตะกรันก
อตัวขึ้นในแผนทำาความรอน
ใชฟงกชั่นขจัดคราบตะกรันอยางนอยหนึ่งครั้ง (ดู
ไดจากบท ‘การทำาความสะอาดและการบำารุงรักษา’
หัวขอ ‘ฟงกชั่นขจัดคราบตะกรัน’)
สัญญาณไฟ Auto-off สีแดง
กะพริบ (เฉพาะบางรนเทานั้น)
ฟงกชั่นตัดไฟอัตโนมัติไดปดเ
ตารีด (ดูจากบท ‘คุณลักษณะ
อื่นๆ’)
ขยับเตารีดเล็กนอยเพื่อปดระบบตัดไฟอัตโนมัติ
สัญญาณไฟสีแดง Auto-off จะดับลง
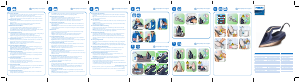
2 3 4 5
6
7 8 9
10 11 12 13
14 15 16 17
18
4239.000.7185.2.indd 1 02-12-09 16:17


이 제품에 대한 대화 참여
여기서 필립스 GC3640 다리미에 대한 귀하의 생각을 공유할 수 있습니다. 궁금한 점이 있으면 먼저 설명서를 주의 깊게 읽어보세요. 매뉴얼 요청은 문의 양식을 사용하여 수행할 수 있습니다.