사용 설명서 필립스 BT7202 턱수염 정리기
필립스 BT7202 턱수염 정리기 에 대한 매뉴얼이 필요하십니까? 아래에서 한국어로 된 PDF 매뉴얼을 무료로 보고 다운로드할 수 있습니다. 이 제품은 현재 1 개의 자주 묻는 질문(FAQ), 0 개의 댓글이 있고 0 개의 투표를 받았습니다. 원하시는 매뉴얼이 아닐 경우 당사로 연락주시기 바랍니다.
제품 결함에 대한 해결책이 사용 설명서에 없나요? Repair Café 가셔서 무료 수리 서비스를 받을 수 있습니다.
사용 설명서
Loading…

Electromagnetic elds (EMF)
- This Philips appliance complies with all
applicable standards and regulations regarding
exposure to electromagnetic elds.
General
- The appliance is suitable for mains voltages
ranging from 100 to 240 volts.
- The supply unit transforms 100-240 volts to a
safe low voltage of less than 24 volts.
Display
Battery status indications
- When the battery is almost empty, the battery
charge indicator ashes orange (Fig. 3).
- When the appliance is charging, the battery
charge indicator ashes white (Fig. 4).
- When the battery is fully charged, the battery
charge indicator lights up white continuously
(Fig. 5).
Note: The lights switch o automatically after
30 minutes.
Hair length indications
The selected hair length setting will show above
the zoom wheel when you select the desired
length setting with the zoom wheel (Fig. 6).
Charging
Charging takes approx. 1 hour. Charge the
appliance before you use it for the rst time and
when the display indicates that the battery is
almost empty.
1 Make sure the appliance is switched o.
2 Put the adapter in the wall socket and put the
small plug in the appliance (Fig. 7).
3 After charging, remove the adapter from the
wall socket and pull the small plug out of the
appliance.
When the appliance is fully charged, it has a
cordless operating time of up to 60 minutes.
Using the appliance
Note: This appliance can be used without cord or
directly from the power outlet.
You can use this appliance for a stubble and
a short beard. This appliance has an integrated
vacuum system that catches cut beard hair for
a less mess trimming experience.
The vacuum system is activated automatically as
soon as you switch on the appliance.
Note: Switch o and clean the appliance after
each use.
Switching the appliance on and o
Press the on/o button once to switch the
appliance on or o (Fig. 8).
Trimming without comb
- You can use the appliance without beard and
stubble comb to trim hair close to the skin or
to contour the neckline and sideburns. To trim
hair close to the skin, place the at side of the
trimming head against your skin and make
strokes in the desired direction (Fig. 9).
- You can use the precision trimmer to create
ne lines and contours around your facial style,
close to the skin (Fig. 10). Simply pull the cutting
element straight o (Fig. 11) and insert the
precision trimmer (Fig. 12).
- For contouring hold the trimming head
perpendicular to the skin and move the
trimming head upwards or downwards with
gentle pressure (Fig. 13).
Trimming with comb
You can use the beard and stubble comb attached
to the cutting element to groom your beard and
moustache in your preferred style. You can choose
from 20 length settings ranging from 0.5mm to
10mm in steps of 0.5mm.
1 Attach the comb onto the appliance (Fig. 14).
2 Turn the zoom wheel to select the desired
length setting (Fig. 6).
Note: When you trim for the rst time, start at
the highest length setting to familiarise yourself
with the appliance.
3 Switch on the appliance.
4 To trim most eectively, move the appliance
against the hair growth direction. Make sure that
the surface of the comb always stays in contact
with the skin (Fig. 15).
Cleaning and maintenance
Cleaning the appliance
Note: Only the cutting element and the comb can
be cleaned with water.
We advise you to empty the hair-collection
chamber after each trimming session. When you
trim long, dense beards, it may also be necessary
to empty the hair-collection chamber during the
trimming session in order to maintain optimal
suction performance.
1 Switch o the appliance and disconnect it from
the power outlet.
2
Wipe the housing of the appliance with a dry
cloth.
3 Remove the comb (Fig. 16) and clean it with the
cleaning brush and/or rinse it under the tap
(Fig. 17).
4 Remove the cutting element and clean it under
the tap (Fig. 18). Shake o excess water and
leave to dry completely.
Caution: Never dry the cutting element with a towel
or tissue, as this may damage the trimming teeth.
5 Shake and/or brush out the hairs that have
collected in the hair chamber (Fig. 19, Fig. 20).
6 After cleaning, reattach the cutting element
(Fig. 21) and comb (Fig. 14) to the appliance.
Recycling
- This symbol means that this product shall not
be disposed of with normal household waste
(2012/19/EU).
- This symbol means that this product contains
a built-in rechargeable battery which shall not
be disposed of with normal household waste
(2006/66/EC). We strongly advise you to take
your product to an ocial collection point or
a Philips service centre to have a professional
remove the rechargeable battery.
- Follow your country’s rules for the separate
collection of electrical and electronic products
and rechargeable batteries. Correct disposal
helps prevent negative consequences for the
environment and human health.
Warranty and support
If you need information or support, please
visit www.philips.com/support or read the
international warranty leaet.
PORTUGUÊS DO BRASIL
Descrição geral (Fig. 1)
1 Lâmina de corte
2 Sistema a vácuo
3 Ajustes de comprimento
4 Controle giratório
5 Botão liga/desliga
6 Indicador de status da bateria
7 Esponja de limpeza
8 Escova de limpeza
9 Plugue pequeno
10 Fonte de alimentação (adaptador)
11 Aparador de precisão
12 Pente para barba e barba por fazer
Nota: Os acessórios fornecidos podem variar para
produtos diferentes. A caixa mostra os acessórios
que foram fornecidos com seu aparelho.
Informações importantes de
segurança
Leia atentamente estas informações importantes
antes de usar o aparelho e seus acessórios.
Guarde-as para futuras consultas. Os acessórios
fornecidos podem variar para produtos diferentes.
Perigo
- Mantenha a fonte de
alimentação seca (g. 2).
Aviso
- A fonte de alimentação
contém um transformador.
Não desligue a fonte de
alimentação para trocá-
la por outro conector, pois
isso causará uma situação
perigosa.
- Carregue o aparelho somente
com a fonte de alimentação
fornecida (HQ8505).
- Este aparelho não deve ser
usado por pessoas (inclusive
crianças) com capacidades
físicas, mentais ou sensoriais
reduzidas ou com pouca
experiência e conhecimento,
a menos que sejam
supervisionadas ou instruídas
sobre o uso do aparelho por
uma pessoa responsável por
sua segurança.
- Crianças devem ser
supervisionadas para que não
brinquem com o aparelho.
- Sempre verique o aparelho
antes de usá-lo. Não use
o aparelho se ele estiver
danicado, pois isso pode
causar ferimentos. Sempre
substitua uma peça danicada
por outra do tipo original.
- Não abra o aparelho para
trocar a bateria recarregável.
Atenção
- Este aparelho não é
lavável. Nunca mergulhe-o
na água nem lave-o em água
corrente (g. 2).
- Só use este aparelho para
o propósito ao qual ele se
destina, conforme mostrado
no manual do usuário.

Loading…
등급
필립스 BT7202 턱수염 정리기 대해 어떻게 생각하시는지 제품 평점을 남겨 알려주세요. 제품 후기 및 질문을 공유하고 싶으신가요? 페이지 하단에 코멘트를 남겨주세요.이 설명서에 대한 추가 정보
필립스 BT7202 턱수염 정리기에 대한 종이 설명서가 있으면 좋다고 생각합니다. 언제든지 당사 웹사이트에서 설명서를 다운로드하여 직접 인쇄하실 수 있습니다. 원본 설명서를 원하시면 Philips에 문의하시기 바랍니다. 원본 매뉴얼을 제공할 수도 있습니다. 다른 언어로 된 필립스 BT7202 턱수염 정리기 설명서를 찾고 계십니까? 홈페이지에서 원하는 언어를 선택하고 모델 번호를 검색하여 사용 가능한지 확인하세요.
명세서
| 브랜드 | Philips |
| 모델 | BT7202 |
| 범주 | 턱수염 정리기 |
| 파일 형식 | |
| 파일 크기 | 1.73 MB |
필립스 턱수염 정리기에 대한 모든 매뉴얼
턱수염 정리기의 추가 매뉴얼
필립스 BT7202 턱수염 정리기에 대해 자주 묻는 질문
저희 지원 팀은 자주 묻는 질문에 대한 유용한 제품 정보 및 답변을 찾고 있습니다. 자주 묻는 질문에 오류를 발견하신다면, 연락 양식에 따라 알려주시기 바랍니다.
다른 머리카락에도 수염 트리머를 사용할 수 있습니까? 확인 됨
수염 트리머는 이발기보다 날이 얇기 때문에 짧은 머리에 더 적합합니다. 헤어 클리퍼는 두피 모발을 다듬기 위해 특별히 설계되었습니다.
도움이 됐습니다 (99) 더 읽어보세요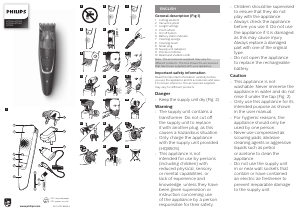
이 제품에 대한 대화 참여
여기서 필립스 BT7202 턱수염 정리기에 대한 귀하의 생각을 공유할 수 있습니다. 궁금한 점이 있으면 먼저 설명서를 주의 깊게 읽어보세요. 매뉴얼 요청은 문의 양식을 사용하여 수행할 수 있습니다.