EnglishEnglish Français
Caution
• Keep the battery out of the reach of children to
prevent them from being swallowed.
•
Do not attach these speakers to walls or ceilings.
• Do not use or install the speakers in the following
places:
Very dusty or sandy/very hot/very humid places
Near clocks/watches or credit cards/bank cards
• Do not insert any foreign objects into the bass
sound output area.
• Do not drop this unit or expose it to strong
shocks.
• To avoid product damage, do not expose this
product to rain, water or other liquids.
• Noise may occur due to dirt on the plug. Clean the
plug with a soft dry cloth if this occurs.
• Do not mix old and new batteries or different types
of batteries.
• Do not use the batteries if the covering has been
peeled off.
•
Do not heat the batteries or expose them to flames.
• Do not recharge ordinary dry cell battery.
• Remove the battery if the unit is not to be used for
a long time.
• Mishandling of battery can cause electrolyte
leakage which can damage items the fluid
contacts and may cause a fire.
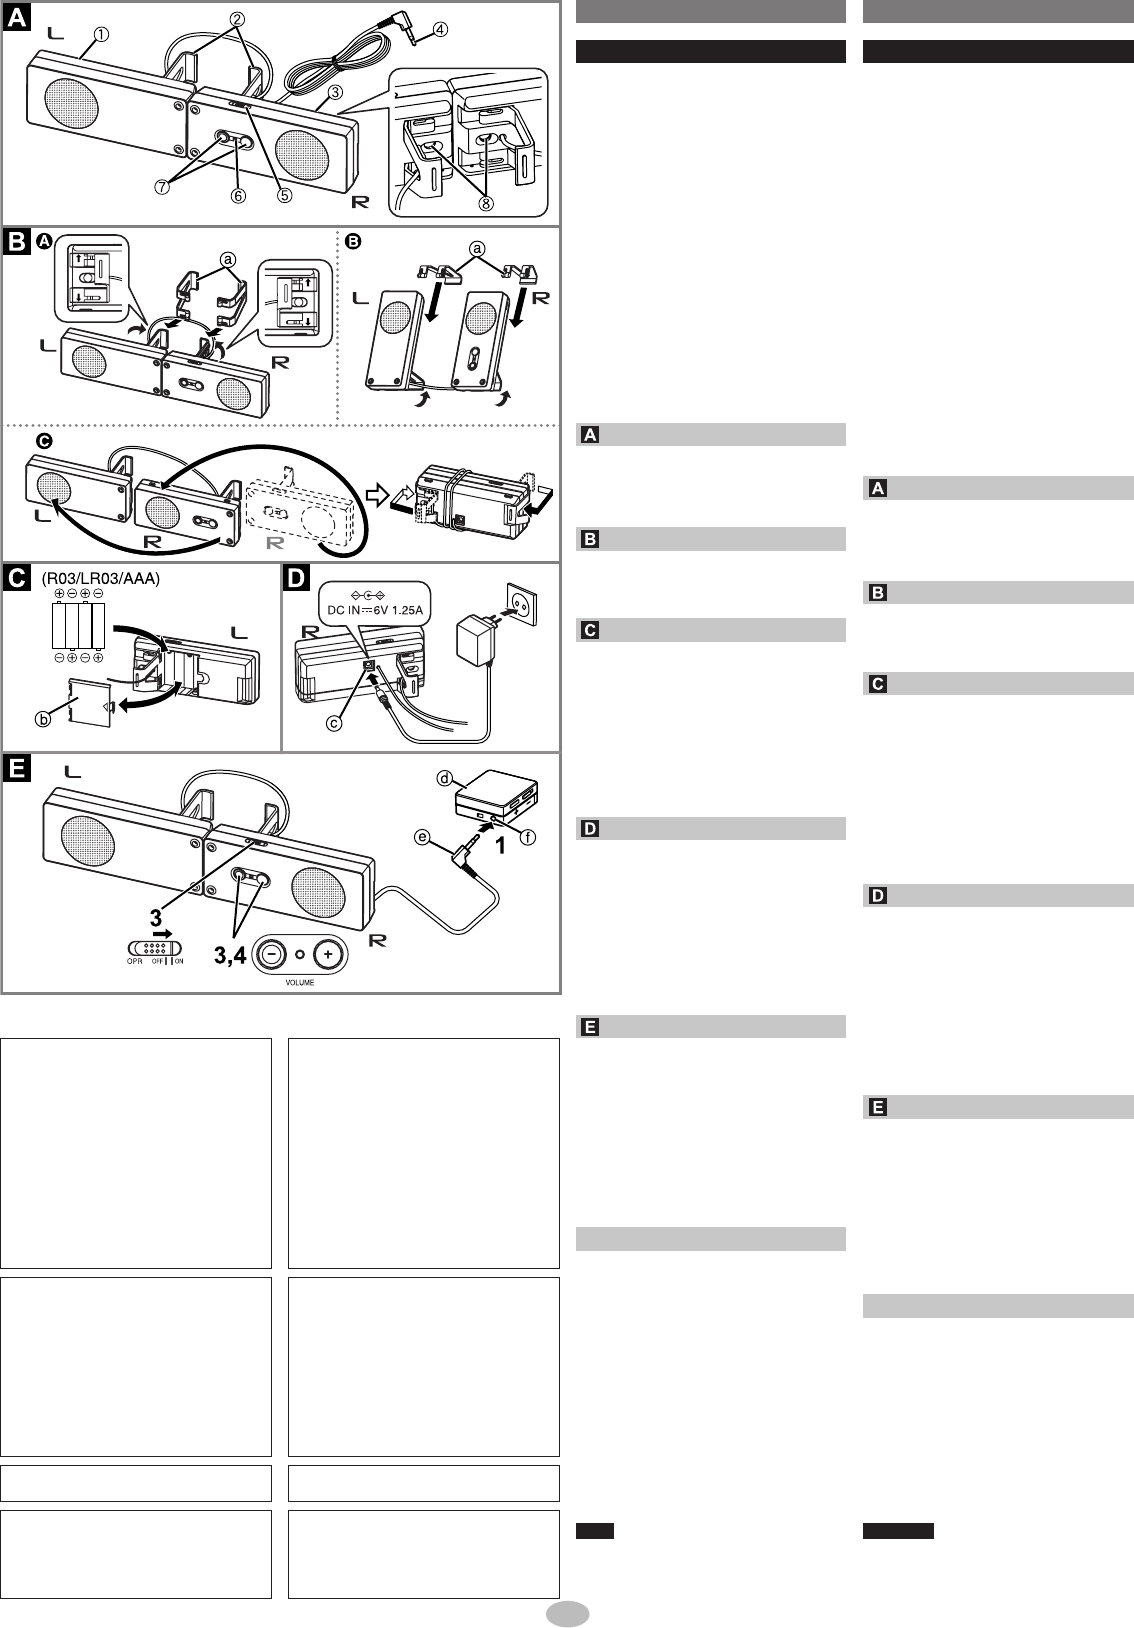
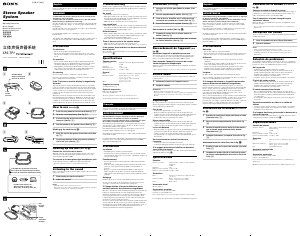
Names of the parts
a
Left speaker
b
Stand (L, R)
c
Right speaker
d
AUDIO IN plug
e
Power switch [OPR, ON/OFF]
f
Operation indicator [OPR]
g
Volume control
h
Bass sound output area
Installation
a Attach stand L to the left speaker and stand R to
the right speaker.
± Horizontal positioning
≤ Vertical positioning ≥ Carrying
Using the batteries
1. Open the battery lid b.
2. Insert the 4 batteries (not included).
Press down on the - end.
Match the poles (+ and -).
3. Close the battery lid b.
If rechargeable batteries are to be used,
rechargeable batteries manufactured by Panasonic
are recommended.
When to change the batteries
Replace with new batteries when the [OPR] indicator
starts to fade and/or flash. Also replace when sound
becomes distorted or fades.
Using the AC adaptor
Connect the AC adaptor (not included).
c DC IN jack (right speaker)
• Use a DC 6 V (1.25 A) AC adaptor.
• Using an AC adaptor with a capacity lower than
1.25 A may cause the AC adaptor to fail.
• The power source switches over to AC power if
you connect the AC adaptor even when batteries
have been inserted.
The unit is in the standby condition when the AC
adaptor is connected. The primary circuit is always
“live” as long as the AC adaptor is connected to an
electrical outlet.
Connection and usage
1. Turn down the volume of the digital audio
player, etc. d, and insert the AUDIO IN plug
e (3.5 mm stereo) into the phone jack f.
2. Adjust the volume to a level at which the
sound from the sound source will not be
distorted.
3. Turn down the volume level of [VOLUME], and
set the [OPR] switch to “ON”.
The [OPR] indicator turns green.
4. Adjust [VOLUME].
If the sound is distorted, turn down the volume of
the unit or the sound source. Using the unit with the
sound distorted may cause the unit to fail.
Specifications
Speaker unit: 40 mm (1-9/16 in.) full range
Impedance: 4
Frequency range: 140 Hz - 20 kHz (at –16 dB)
Output power: 2 W + 2 W (10% THD, 1 kHz)
Power requirements: DC 6 V,
4 batteries (R03/LR03, AAA)
or AC adaptor (6 V, 1.25 A)
Approximate play times:
60 hours (alkaline batteries)
Plug: L-type 3.5 mm (1/8 in.) stereo
Cord length: 0.5 m (1.6 ft.)
Dimensions (W × H × D):
140 mm × 56 mm × 30 mm (without stand)
(5-1/2 in. × 2-3/16 in. × 1-3/16 in.) (without stand)
140 mm × 56 mm × 82 mm (using the stand)
(5-1/2 in. × 2-3/16 in. × 3-1/4 in.) (using the stand)
144 mm × 56 mm × 60 mm (carrying)
(5-11/16 in. × 2-3/16 in. × 2-3/8 in.) (carrying)
Mass (without batteries):
L: 120 g (4.2 oz.), R: 140 g (4.9 oz.)
Note
The actual life of the battery depends on operating
conditions.
Specifications are subject to change without notice.
Mass and dimensions are approximate.
SUOMI
VAROITUS!
ÄLÄ ASENNA TAI LAITA TÄTÄ LAITETTA
KABINETTITYYPPISEEN KIRJAKAAPPIIN
TAI MUUHUN SULJETTUUN TILAAN, JOTTA
TUULETUS ONNISTUISI. VARMISTA, ETTÄ
VERHO TAI MIKÄÄN MUU MATERIAALI
EI HUONONNA TUULETUSTA, JOTTA
VÄLTETTÄISIIN YLIKUUMENEMISESTA
JOHTUVA SÄHKÖISKU- TAI TULIPALOVAARA.
ÄLÄ PEITÄ LAITTEEN TUULETUSAUKKOJA
SANOMALEHDELLÄ, PÖYTÄLIINALLA,
VERHOLLA TAI MUULLA VASTAAVALLA
ESINEELLÄ.
ÄLÄ ASETA PALAVAA KYNTTILÄÄ TAI MUUTA
AVOTULEN LÄHDETTÄ LAITTEEN PÄÄLLE.
HÄVITÄ PARISTOT LUONTOA
VAHINGOITTAMATTOMALLA TAVALLA.
VAROITUS:
TULIPALON, SÄHKÖISKUN TAI TUOTTEEN
VAURIOITUMISEN RISKIN PIENENTÄMISEKSI:
ÄLÄ ALTISTA TÄTÄ LAITETTA SATEELLE,
KOSTEUDELLE, TIPPUVALLE NESTEELLE
TAI ROISKEILLE. LAITTEEN PÄÄLLE EI
MYÖSKÄÄN SAA LAITTAA NESTEELLÄ
TÄYTETTYJÄ ESINEITÄ KUTEN MALJAKOITA.
KÄYTÄ VAIN SUOSITELTUJA LISÄVARUSTEITA.
ÄLÄ IRROTA KANTTA (TAI TAKAKANTTA).
SISÄLLÄ EI OLE KÄYTTÄJÄN KORJATTAVISSA
OLEVIA OSIA. JÄTÄ HUOLTO PÄTEVIEN
HUOLTOHENKILÖIDEN TEHTÄVÄKSI.
TÄMÄ LAITE ON TARKOITETTU
KÄYTETTÄVÄKSI LEUDOSSA ILMASTOSSA.
Pistorasia tulee asentaa laitteen lähelle
helppopääsyiseen paikkaan.
Verkkojohdon pistokkeen on oltava aina helposti
käytettävissä.
Tämä laite voidaan kytkeä kokonaan irti verkkovirrasta
irrottamalla verkkojohdon pistoke pistorasiasta.
NORSK
ADVARSEL!
APPARATET MÅ IKKE PLASSERES I EN
BOKHYLLE, ET INNEBYGGET KABINETT
ELLER ET ANNET LUKKET STED HVOR
VENTILASJONSFORHOLDENE ER
UTILSTREKKELIGE. SØRG FOR AT GARDINER
ELLER LIGNENDE IKKE FORVERRER
VENTILASJONSFORHOLDENE, SÅ RISIKO
FOR ELEKTRISK SJOKK ELLER BRANN
FORÅRSAKET AV OVERHETING UNNGÅS.
APPARATETS VENTILASJONSÅPNINGER MÅ
IKKE DEKKES TIL MED AVISER, BORDDUKER,
GARDINER OG LIGNENDE.
PLASSER IKKE ÅPEN ILD, SLIK SOM
LEVENDE LYS, OPPÅ APPARATET.
BRUKTE BATTERIER MÅ KASSERES UTEN
FARE FOR MILJØET.
ADVARSEL:
FOR Å REDUSERE FAREN FOR BRANN,
ELEKTRISK STØT ELLER SKADE PÅ PRODUKTET,
MÅ DU IKKE UTSETTE DETTE APPARATET
FOR REGN, FUKTIGHET, DRYPP ELLER
SPRUT, OG INGEN GJENSTANDER SOM ER
FYLT MED VÆSKE, SOM F.EKS. VASER, MÅ
PLASSERES PÅ APPARATET,
MÅ DU KUN BRUKE ANBEFALT TILBEHØR,
MÅ DU IKKE FJERNE DEKSELET (ELLER BAKSIDEN);
INNEHOLDER INGEN DELER SOM BRUKEREN
KAN REPARERE. OVERLAT REPARASJONER TIL
KVALIFISERTE REPARATØRER.
DETTE APPARATET ER BEREGNET TIL BRUK
UNDER MODERATE KLIMAFORHOLD.
Strømuttaket må befinne seg i nærheten av
utstyret og være lett tilgjengelig.
Støpslet på strømkabelen må være klart til bruk.
Når dette apparatet skal kobles helt fra strømnettet
(AC), må støpslet på strømkabelen trekkes ut av
stikkontakten.
Attention
• Gardez les piles hors de portée des enfants pour
éviter qu’ils ne les avalent.
•
Ne fixez pas ces enceintes sur les murs ni au plafond.
• Ne pas utiliser ni installer les enceintes aux
emplacements suivants :
Endroits très poussiéreux ou sablonneux, ainsi
que les endroits très chauds ou humides
Près des horloges, montres, cartes de crédit ou
cartes bancaires
• N’insérez aucun corps étranger dans la zone de
sortie des graves.
• Ne pas laisser tomber l’appareil ni l’exposer à des
chocs violents.
• Pour éviter d’endommager le casque, protégez-le
de la pluie, de l’eau ou d’autres liquides.
• La présence de poussière sur la prise risque
d’engendrer du bruit. Nettoyez alors la prise avec
un chiffon sec et doux.
• N’utilisez pas ensemble des piles usagées et des
piles neuves, ni des piles de types différents.
•
N’utilisez pas les piles si leur revêtement a été retiré.
• Évitez de chauffer les piles ou de les exposer à
des flammes.
•
N’essayez pas de recharger la pile sèche ordinaire.
• Si vous prévoyez que l’appareil restera longtemps
inutilisé, retirez la pile.
• Une mauvaise utilisation de la pile peut provoquer
des pertes d’électrolyte, ce qui peut endommager
les pièces avec lesquelles le liquide entre en
contact et provoquer un incendie.
Nomenclature des pièces
a
Haut-parleur gauche
b
Support (L, R)
c
Haut-parleur droit
d
Fiche AUDIO IN
e
Interrupteur d’alimentation [OPR, ON/OFF]
f
Témoin de fonctionnement [OPR]
g
Commande de volume
h
Zone de sortie des graves
Installation
a Fixez le support L au haut-parleur gauche et le
support R au haut-parleur droit.
± Positionnement horizontal
≤ Positionnement vertical ≥ Transport
Utiliser les piles
1. Ouvrez le couvercle du logement à piles b.
2. Insérez 4 piles (non fournies).
Appuyez sur l’extrémité -.
Faites correspondre les pôles (+ et -).
3. Fermez le couvercle du logement à piles b.
Si l’on doit utiliser des batteries rechargeables, il est
recommandé d’utiliser des batteries rechargeables
de marque Panasonic.
Quand changer les piles
Remplacez les piles par des neuves lorsque le
témoin [OPR] commence à pâlir et/ou à clignoter.
Remplacez-les aussi lorsque le son devient distordu
ou lorsqu’il faiblit.
Utiliser l’adaptateur secteur
Branchez l’adaptateur secteur (non fourni).
c Prise DC IN (haut-parleur droit)
• Utilisez un adaptateur secteur CC 6 V (1,25 A).
•
Si vous utilisez un adaptateur secteur d’une
capacité inférieure à
1,25
A, il risque de subir des
dommages.
• Même si les piles sont insérées, la source
d’alimentation commutera sur l’alimentation
secteur si vous branchez l’adaptateur.
L’appareil est en mode de veille lorsque l’adaptateur
secteur est branché. Le circuit primaire demeure sous
tension tant que l’adaptateur secteur est branché sur
une prise de courant.
Raccordement et utilisation
1. Baissez le volume du lecteur audio numérique,
etc. d, et insérez la fiche AUDIO IN e (3,5 mm
stéréo) dans la prise audio f.
2.
Réglez le volume sur un niveau pour lequel le
son de la source sonore ne sera pas distordu.
3. Baissez le niveau de [VOLUME], et réglez le
commutateur [OPR] sur “ON”.
Le témoin [OPR] devient vert.
4. Réglez [VOLUME].
Si le son est distordu, baissez le volume de l’appareil
ou de la source sonore. L’appareil risque de subir des
dommages si vous l’utilisez avec le son distordu.
Fiche technique
Haut-parleur: 40 mm, gamme étendue
Impédance: 4
Plage de fréquence: 140 Hz - 20 kHz (à –16 dB)
Puissance de sortie: 2 W + 2 W (DHT 10%, 1 kHz)
Consommation: 4 piles CC 6 V (R03/LR03, AAA),
ou adaptateur secteur (6 V, 1,25 A)
Temps de lecture approximatifs:
60 heures (piles alcalines)
Fiche: 3,5 mm stéréo, type L
Longueur du cordon: 0,5 m
Dimensions (L × H × P):
140 mm × 56 mm × 30 mm (sans support)
140 mm × 56 mm × 82 mm (utiliser le support)
144 mm × 56 mm × 60 mm (transport)
Poids (sans les piles): L : 120 g, R : 140 g
Remarque
La durée de vie effective de la pile dépend des
conditions d’utilisation.
Spécifications sont sujettes à modifications sans
préavis.
Les poids et les dimensions sont approximatifs.
5
RQT9000-E(RP-SP48T1).indd6RQT9000-E(RP-SP48T1).indd6 2007/02/0518:16:192007/02/0518:16:19


이 제품에 대한 대화 참여
여기서 파나소닉 RP-SP48T1 스피커에 대한 귀하의 생각을 공유할 수 있습니다. 궁금한 점이 있으면 먼저 설명서를 주의 깊게 읽어보세요. 매뉴얼 요청은 문의 양식을 사용하여 수행할 수 있습니다.