
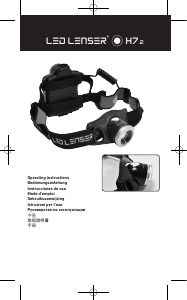
We are delighted that you have purchased one
of our products.
These are usage instructions to help you
familiarize yourself with your new purchase.
All the documents accompanying the product
must be read attentively before using the
product, stored for future use and, if the product
is transferred to a third party, the documents
should be handed over as well. This ensures
that maximum benefit is drawn from the product
and questions from users can be resolved when
they arise.
Above all, comply with the warnings and safety
instructions and dispose of the packaging
material properly.
Additional information for H14.2 with TEST IT
function.
Your LED LENSER® H14.2 headlamp comes with
a TEST IT function (item no. 7397). This allows
users to test the brightness while the product
is still in the packaging. To test, simply push
the yellow TEST IT button on the front of the
package. Please do not look directly into the
light when testing.
The TEST IT button is connected to the battery
housing of the H14.2 via two wires and should
be removed prior to use.
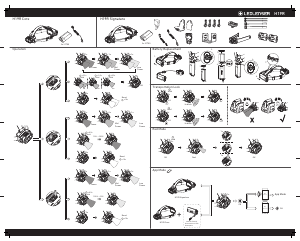
To remove the TEST IT button and wires, open
the battery compartment and separate the two
TEST IT button wires from the battery housing
by pulling it until it releases from the battery
housing. Close the battery box. Please dispose
of and recycle the packaging and TEST IT button
with the wires according to the local regulations.
Product
7299, LED LENSER® H14.2 (gift box)
7399, LED LENSER® H14.2 (Blister with TEST IT
function)
Version of the operating manual: V 1.6
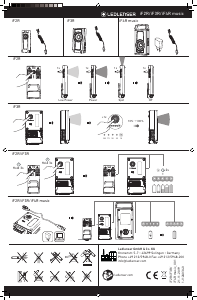
1. Battery set:
4 X AA / LR6 (1.5 V DC)
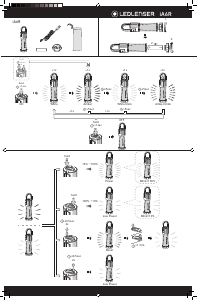
2. Turning it ON and OFF
There are two switches on the H14.2. The
front switch is located in the right side of the
headlamp housing. This button is used to turn
the H14.2 ON/OFF. It is also used to activate
the various Light Programmes and Lighting
Functions (see section 5), and to active the
transport lock functions (see section 6).
The multi-function wheel switch is located
on the back in the upper part of the battery
compartment. This allows you to adjust the
brightness and flash rate infinitely and to
change the light modes programmes (see
section 5)
3. Focus
In the front, narrower region of the headlamp
housing is the reflector lens located. This lens
focused the light of the white LED through our
patented "Advanced Focus System".
The reflector lens is held by an alu. housing.
You can pull and push the front housing by two
fingers, and thus adjust the focus quickly and
easily. This is our speed Focus, which allows the
adjustment of the light beam’s focus.
You also can adjust the hinge of the headlamp,
depending on whether you want to illuminate an
area in the distance or in front of you. For this,
you simply tilt the part of the lamp head, which
containing the reflector lens and the white LED.
The gradual detent allows also intermediate
positions.
4. Smart Light Technology (SLT)
Smart Light Technology (SLT) is a programme
that consists of a computer-optimized
microcontroller which allows our products to
have various lighting functions. The H14.2 is
equipped with this technology and is therefore
able to use various Light Programmes and Light
Functions (see section 5) with an interface that
is simple and user-friendly. Pressing the front
switch on the lamp head allows you to activate
the following Light Functions: On (‘Power’) –
Off, ‘Low Power’, ‘Boost’, ‘Dim’ and ‘Blink’. Using
the multi-function wheel switch on the back,
the light intensity of the ‘Dim’ function and
flashing rate of the ‘Blink’ function are infinitely
adjustable by easily rotating the switch.
5. Light programmes and light functions
The H14.2 is equipped with one LED (light
emitting diode). The white LED is very strong
and ideal for normal use. For example if the
Speed Focus or the adjustment of the angle of
light beam to the horizontal should be used. It is
not suggested to use when the user has adapt
to the surrounding dark environment.
After selecting one of the three light
programmes (1. ‘Easy Low’, 2. ‘Easy Power’ or 3.
‘Signal’) and one of the light functions, there are
three sub-modes under each light programme
(‘Power’, ‘Low Power or 12 Hz ‘Signal’), The
default mode is the Light Program, ‘Easy Low’.
The function below can only be activated when
the product is not connected to the adaptor and
the transport lock function is deactivated. To
switch between the three Light Programmes,
you have to press the multi-function wheel
switch (rotary switch) on the back of the
battery compartment for at least 5 seconds.
The light indicates correct activation with a
corresponding number of flashes (1 x, 2 x or 3 x).
Immediately after the chosen light programme
is set, the lamp is switched on.
30-second BOOST mode
If the front cap switch is pressed for about 3
seconds when the product is not connected to
the adaptor and transport mode is deactivated,
the product will go into BOOST mode. Please
release the switch when you enter into Boost
mode. If you push the switch for longer than
5 seconds, the product will go into transport
lock mode (please see section 6). After being in
BOOST mode for 30 seconds, the product will
automatically return to the previous function
setting.
5.1 Light program – Easy Low: In this Light
program, the lamp starts up with the Light
Function ‘Low Power’ (dimmed light) activated
when the front switch is pressed once. Press
the front switch twice within 2 second to turn on
the Light Function ‘Power’ (full light). Another
press will turn off the lamp.
5.2 Light program – Easy Power: In this Light
02
English | Page 02-05
GB

이 제품에 대한 대화 참여
여기서 Led Lenser H14.2 손전등에 대한 귀하의 생각을 공유할 수 있습니다. 궁금한 점이 있으면 먼저 설명서를 주의 깊게 읽어보세요. 매뉴얼 요청은 문의 양식을 사용하여 수행할 수 있습니다.
응답 | 도움이 됐습니다 (0) (Google에서 번역함)